


Background
Miles By Motorcycle originally grew out of my desire to have a better place for my friends and I to discuss, plan, and document our motorcycle travels.
There's quite a bit of of knowledge involved in travelling long distance by motorcycle. There are bikes to consider for differents kinds of trips. There are awesome roads hidden between seemingly endless superslab and conjested towns. There are hidden gem places only locals know. There are shops, restaurants, cool old hotels, campgrounds, and sites to see. There are techniques to learn and skills to hone. There's good equipment and bad. The farkles never end and what parts to buy are a constant topic. Peruse advrider.com or any other motorcycle travel forums and you'll see they contain a wealth of knowledge, insights, and recommendations that are often hard to find as they are drowned out by a cacophony of other posts. And, if you're like me, finding those great posts when you need them again later is a constant challenge.
ADVrider and forums like it are a great resource but I wanted something different. I wanted to build a place where our normal everyday conversations would turn into a kind of "actionable" geographic library that we could use to start dreaming about trips. Then with all those potential trip ideas neatly organized in one place, turn them into concrete plans and then into action. And once we've returned from our travels Out There, tell our story so that others can start building their dreams off of them.
You could think of it as "closing the loop". Read stories of travel to far away places to fuel your imagination. Plan. Go ride. Come back and tell your story. Start the process over again.
For example, I recently took a trip down to the Smoky Mountains on my Suzuki DR650SE to go explore unpaved roads with Wayne Busch who runs America Rides Maps. It was a great trip filled with good company, fantastic roads, and unbelievable views.
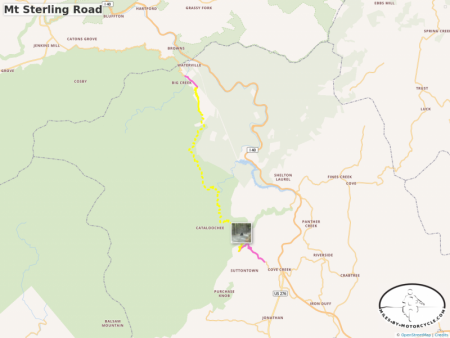
During my return trip, I happend upon what is now one of my favorite roads. Mt Sterling road runs through the Smokey Mountains National Park and is a simply awesome road that I intend to ride again the next time I'm down there. If you like unpaved mountain roads that turn into wickedly twisty smooth pavement I strongly suggest it. It's a blast.
Now, what do you do with this information?
- Where do you put it?
- How, years from now when you finally take that ADV trip through that area, do you find it?
- How do you use it to navigate to it's start or end?
What if you could just click on it and save it on some map for later?
What if you could do the same with any photo?
Unable to embed shared object. Sharing permissions error?On Facebook, I've often been frustrated when photos of great roads are posted and I have no way to find out where they are. I want to be able to click on it, add it to a list or a map, and then, when I have the time or am in that general area, ask the question, "Remind me again, what roads in this area did I mean to ride? Where was that waterfall or overlook?"
Having that kind of capability would change my trips for the better. However, to turn this idea into a reality, I needed to build my own mapping system, search engine, and site software that organizes all the elements of mapping differently than I've seen done.
This then answers the question I have been asked so often, "Dude, are you nuts? Why are you building all this instead of using something like Wordpress?"
It has turned out to be quite the insanely large project for just one developer (little 'ol me all by my lonesome) but, while still actively in development, it is now near the stage where it can be successfully used to plan trips, mark great new roads, and document rides. There are a number of other things in the works as well.
As a side-effect, it's also a turned into pretty good way of building motorcycle maps, planning routes, editing tracks, and working with GPX files.
Features
The Miles By Motorcycle mapping system allows you to :
-
GPX FILE UPLOAD/DOWNLOAD/SHARING:
- upload a GPX files generated by your GPS or another site containing favorites, routes, and tracks and display it on a map.
- cut sections or remove tracks
- edit or remove favorite markers
- add, edit, or remove routes, waypoints, and points of interest.
- export the edited GPX file for use on your GPS or other device.
- make the GPX file available for download by others members of the site.
-
GEOLOCATION
- find locations on the map by address or city and state.
- find locations on the map by address or city and state.
-
TAGGING
-
add tags (a.la. Twitter hash tags) to all maps, routes, tracks, pois, photos, videos, links, comments, posts, and articles (whether your own or by others) and use those tags in the site search bars to find those items later.
-
-
ROUTES
- plan routes consisting of many waypoints.
- plan multiple routes per map.
- drag, add, insert, and remove route waypoints.
- title, describe, and tag each route individually.
- split routes
-
TRACKS:
- title, describe, and tag tracks individually.
- pare down tracks by cutting out sections.
- remove route sections
-
CURATE ROUTES AND TRACKS
- add photos, videos, points of interest, and links and associate them with routes or tracks.
- mark paved vs unpaved and best vs normal roads.
- mark technical vs easy roads.
-
SAVING AND SEARCHING
- save all items in a map individually.
- using the advanced search button at the top, search for individual parts of a map. (Search for routes, POIs, tracks, etc).
- search by keyword, tag, and member.
- use the 'mentions' button on an item to see on what maps (or elsewhere) it's been mentioned.
-
EDITING
-
edit maps, routes, and tracks
-
-
POINTS OF INTEREST
- add points of interest to the map to mark notable locations such as scenic views, campsites, restaurants, gas stations, motels, notable cross roads
- title, describe, and add tags to each points of interest.
- add photos, videos, and links to add more context to the point of interest.
-
PHOTOS
- upload photos which can be displayed on the map.
- optionally place photos using the photo's geotagged location.
- add titles, descriptions, and tags.
-
YOUTUBE/VIMEO VIDEOS
- add youtube or vimeo videos directly to the map.
- add titles, descriptions, and tags.
-
SHARING
- share static screenshots that are created whenever you save a map.
- embed the map in blog posts, forum posts, or comments on the site.
- share links to the map off-site.
-
CONVERSATIONS:
- have conversations directly on tracks, routes, POIs, photo, videos, maps, rides, etc.
- have conversations directly on tracks, routes, POIs, photo, videos, maps, rides, etc.
-
RIDE PLANS
- click on any geotagged photo, point of interest, track, or route anywhere on the site to add them to "ride plans".
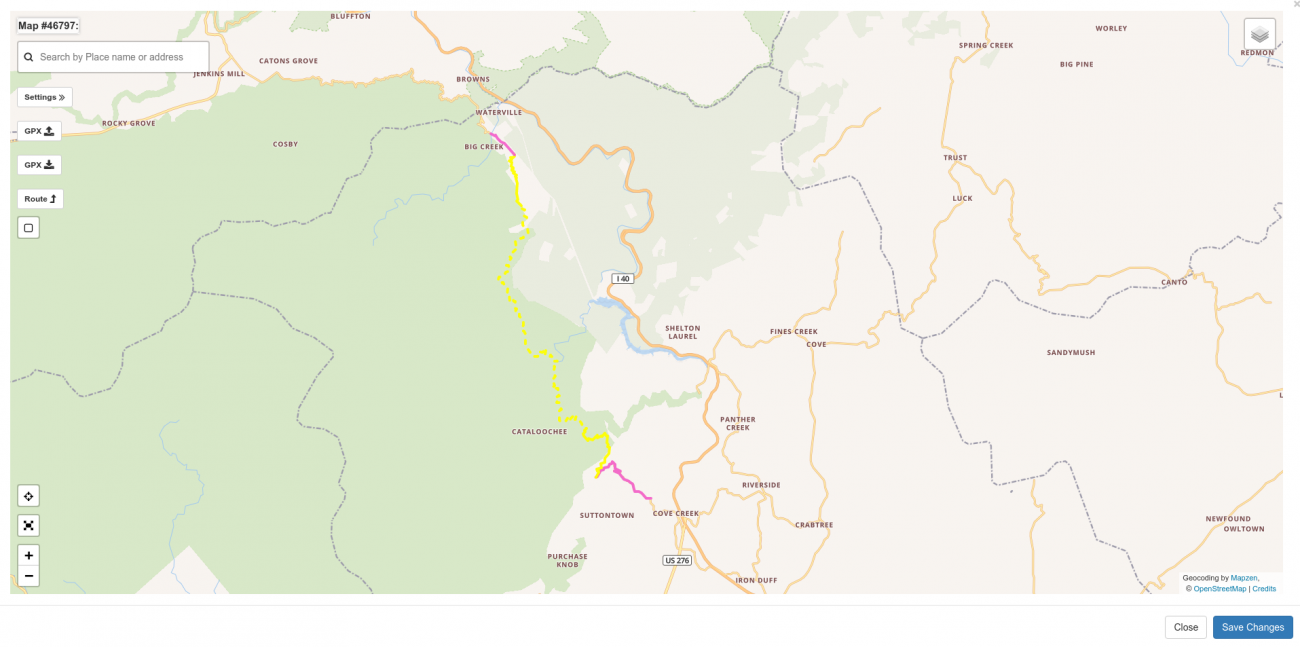
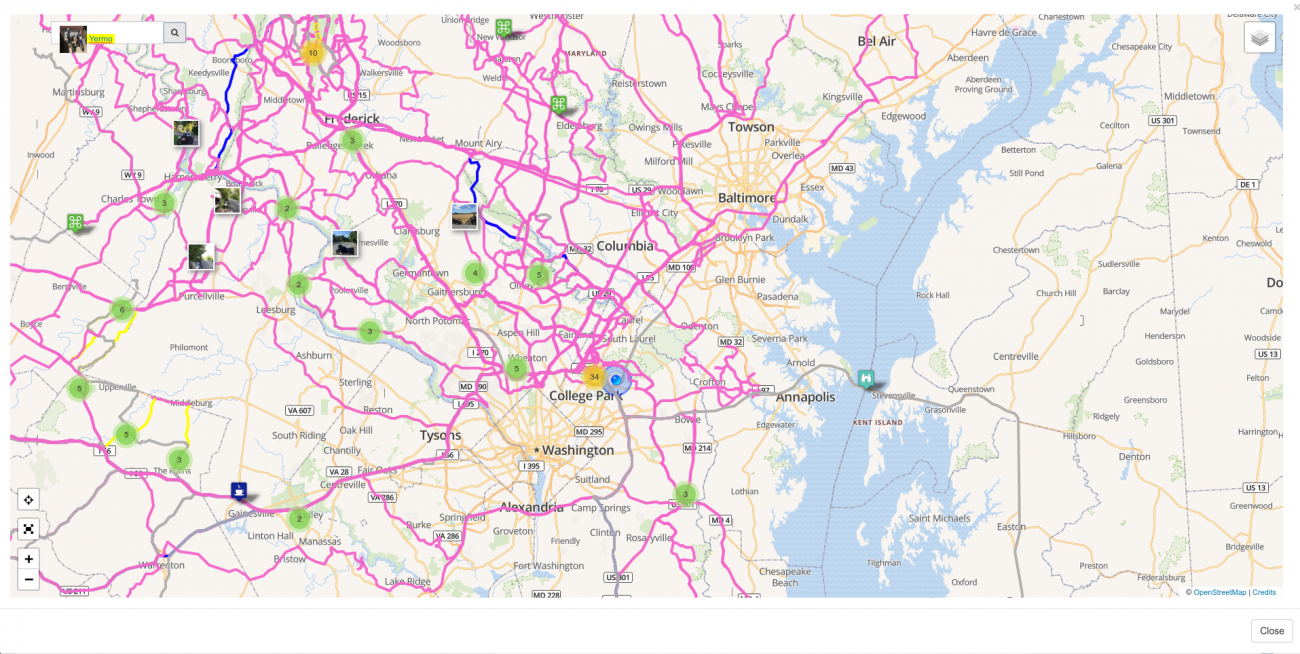
For example, you can see many of the basic mapping features in action if you click on the following map which documents one of my favorite Greater Washington DC area rides:
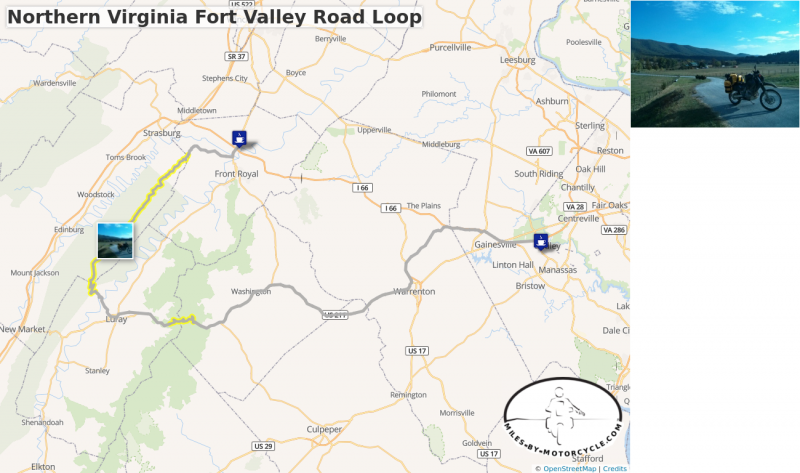
Northern Virginia Fort Valley Road Loop
This is one of our favorite routes through Northern Virginia. We typically start out at 55 where it meets 15 and take side roads down to 17 until it connects to 211.
There's a wonderful section of tight technical but well graded switchbacks on 211 as you approach and cross Skyline Drive.
We usually have lunch in Luray and from there head up to Route 675 which is a series of switchbacks the carves it's way up the side of the mountain. There are wonderful vistas as you go up. Very pretty.
From there you catch Fort Valley Road which goes on seemingly forever as it winds it's way through this magical looking valley of pristine farms and old buildings. It eventually narrows to a tight state park road that follows a roaring creek bordered by steep canyon walls in a deep wood.
We typically make our way to the Starbucks in Front Royal before taking the Superslab back home. Sometimes we'll take 55 for some local color as it winds it's way seemingly through towns that time forgot.
The best sections are tagged in yellow.
Creating Maps
Maps can be created in two places on the site:
- in your personal profile
- in a group that you belong to.
At this time, the only difference between the two locations is who can see the map:
- Maps created in your personal profile may be viewed by anyone logged into the site but, as of this writing, cannot be shared off-site. (This will be improved as I rework how privacy works on the site.)
- Maps created in a members-only group may be viewed by any member of the group but no one else and cannot be shared off-site.
- Maps created in a public group may be viewed by anyone on the site in addition to any anonymous visitors coming in from the net. (For sharing maps off-site for example to Facebook or Twitter, posting them to the MBYMC Public Group is your best bet at the present moment.)
NOTE: As of this writing, creating maps is best done on a computer with a mouse. While maps can be created on a mobile phone or tablet, using touches to mark fine locations on the map remains a challenge. I typically create and edit my maps on a computer and then view them on a phone when I'm out on a ride. I also often export the map to a GPX file that I load onto my GPS. (I have Garmin Zumo 550.)
To create a new map in your personal profile, click on your username in the upper right corner of the site then click the Maps tab then the "New Map" button.
To create a new map in a group, select the group from the Groups dropdown menu at the top, select the Maps tab, and then click the "New Map" button.
Working with the Map
When you click the New Map button, a window will appear populated with a map. If your location can be determined (that is, if you allow geolocation) the map will be centered roughly at your location or it may be zoomed out to a world view.
There are a number of buttons. The image below lists out their meanings. (You can click any image in this article for a larger view).
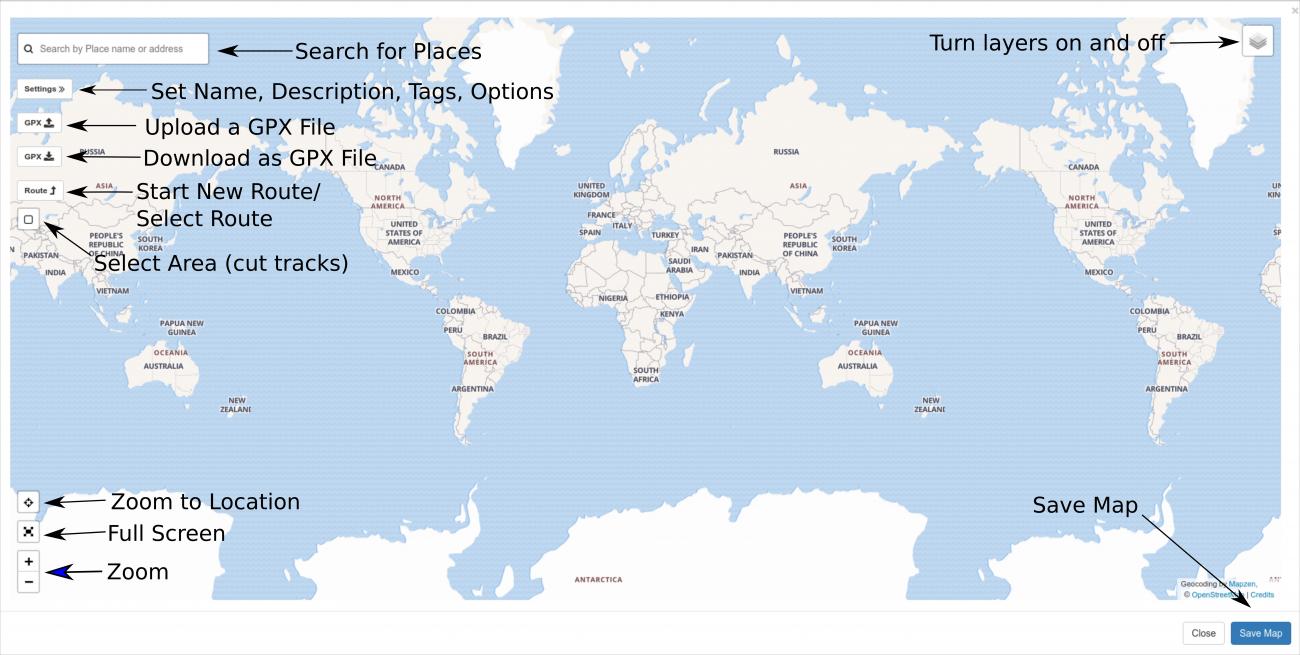
You can zoom the map in and out using the zoom buttons or the mouse wheel. You can also drag the map around.
Finding Locations
To find some specific location in the world, use the search bar at the top. The address lookup is provided by a company called MapZen and is based on free and open data. Unfortunately for those of us spoiled by Google address lookups, it leaves something to be desired. City and state name lookups (e.g. College Park, Maryland) seem to work pretty reliably. Complete addresses in populated areas also seem to work pretty well. Outside of major metropolitan areas, however, address lookup seems less reliable. When it can't find a given address, I find it's easiest to search for the nearest town and then zoom into the map and find what I'm looking for. (If we ever get the money to afford a more robust commercial address lookup service, I'll improve this. In the mean time, I am constantly on the lookout for better free options. MapZen is, at least, significantly better than the previous service I was using. Unfortunately, Google's and Bing's terms of service prevent me from using their lookups here.)
The steps are:
- enter an address or a town, state in the search box.
- press ENTER to reduce the number of matches.
- click on the correct match from the list.
- (ignore the bug that places the buttons over the results. I will fix it.)
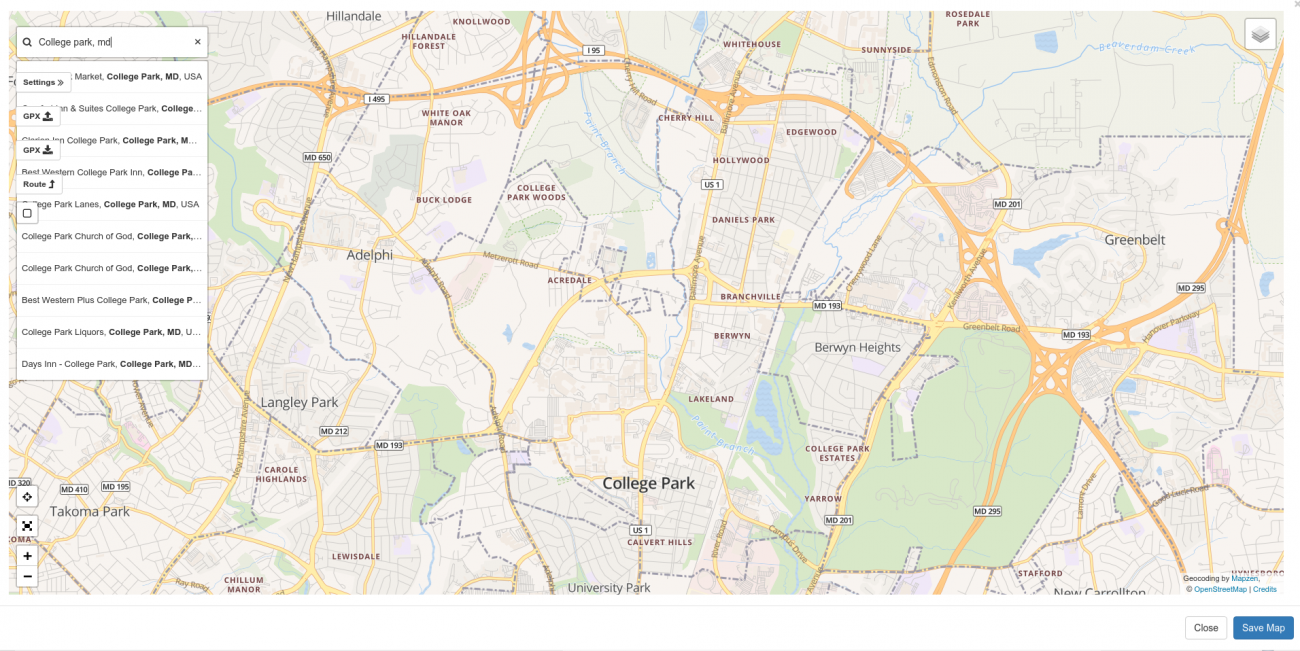
When you select a name from the search list, the map will pan and zoom to that location, drop a pin, and present you with the Map Click Popup.
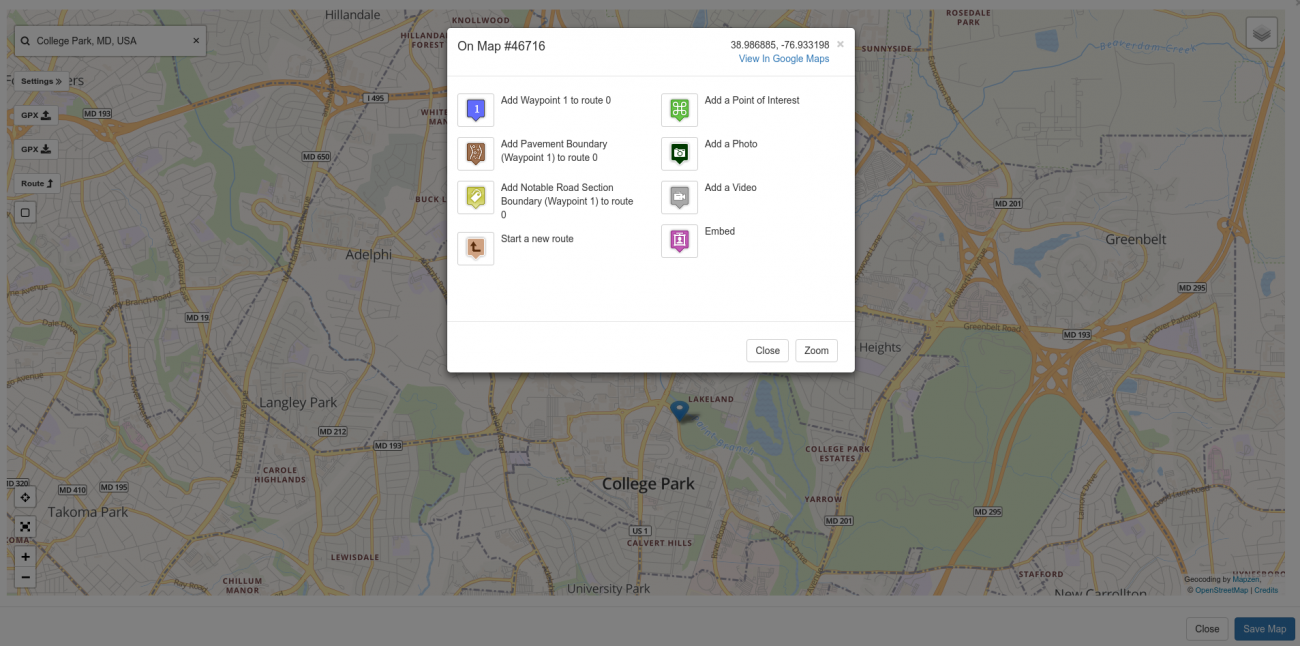
Notice the latitude and longitude of the point on the map in decimal notation is listed in the upper right. I often use this when I'm out on a ride to enter the coordinates for a given place into my GPS.
There is also a link to the same spot in Google Maps if you prefer a Google. (If you can't beat 'em, join 'em.)
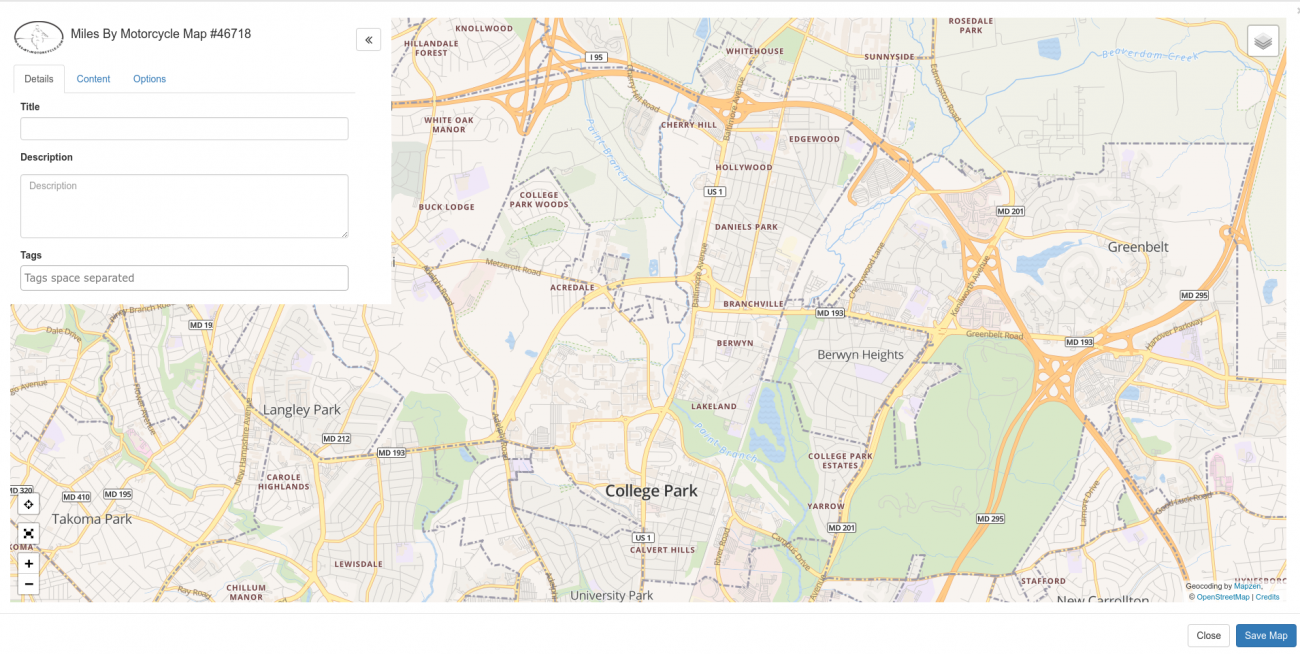
Map Settings: Title and Description
A big part of the mapping solution here is to be able to organize maps and all the elements on them in such a fashion that they are easy to find again later.
There is a settings button in the upper left which when clicked will open up a slide out panel.
Here you can add a title for your map. You should choose something descriptive the captures the point of the map so you can find it later.
There is also a description box where you can describe your map in more detail.
The keywords present in the title and description are used when searching the site.
Tagging
Tagging is a central theme on Miles By Motorcycle. Tags on Miles by Motorcycle work much in the same way that tags on Twitter and Facebook do. Tags can be thought of as categories you add to a post that help you find that post again. Tags take the form of single words and are displayed below the map when you view it. Virtually anything you post on the site supports being tagged. This includes maps, routes, tracks, points of interest, links, photos, videos, posts, comments, articles, etc.
There's no "correct" way to use tags. They are there for you to organize your maps and other things you post so you can find them again.
Some examples of tags I've used on my routes and tracks are:
- twisty - for twisty roads
- goodroad - for roads I particularly liked
- technical - for technical roads (will also cause the road to be rendered in red)
- easy - for easy crusing roads (will also cause the road to be rendered in blue)
- seattletrip2013 - for the maps, routes, and posts I put together around my 2013 cross country trip
- todo - for roads I'd like to ride or places I'd like to visit
- scenic - for particulary pretty places
Tags can be applied to other things on the site as well including forum posts, photos, and links. For example, I frequently use these tags:
- k100rs - for anything related to my street bike
- tech - technical subjects
The tags can then be used to search the site. Simply type a # followed by the first few letters of the tag in the site search bar at the top of the site and then select the item from the drop down list. For example, I tagged the Fort Valley Road Loop map above with "local_favorite", "scenic", and "twisty".
You can also just click on any displayed tag to see all the other items on the site with the same tag.
You can also add your own tags to anything else on the site, not just things you post. There is a small tag icon at the bottom of most posts, maps, routes, etc. By clicking it you can add your own tags. I typically do this when I find some interesting on the site that I want to remember. I also do this with interesting discussions in the forums and with photos and links people post. Sometimes I use tags instead of a ride plan if I think others might be interested. For example, when people mention unpaved roads and don't add the adv, offroad, or pavement_ends tags, I'll often go in and add them.
You then have quite a few options for narrowing down your searches to find what you have tagged. See the section on Searching below.
Uploading a GPX File
GPX stands for GPS Exchange Format and is a standard file format for exchanging route, track, and point information between GPS devices and GPS software. Every GPS I have come across can both import and export GPX files. For a bit more information on GPX files see this article I recently wrote.
If you have a Garmin GPS, when you plug it into your computer, look in the Garmin/GPX directory (folder) on the device. In there you should see a Current.gpx file. That will contain any routes and favorites you've added in addition to a track of any of your recent travels. You can use this to create a map of your rides which, these days, is something I do for virtually every ride I take.
You can also get GPX files from other sources. For example. RoadRunner makes a bunch of their routes available as GPX files. There are sites dedicated to the exchange of GPX tracks. GPX tracks are often mentioned on AdvRider. (You can enter #gpx in the search bar here, select gpx from the dropdown and hit search to see the links I've tagged with GPX.)
Once you have a GPX file, uploading it to a map is just a matter of clicking the GPX Upload button (first button under the location search bar on the left of the map.)
Select the file and click upload.
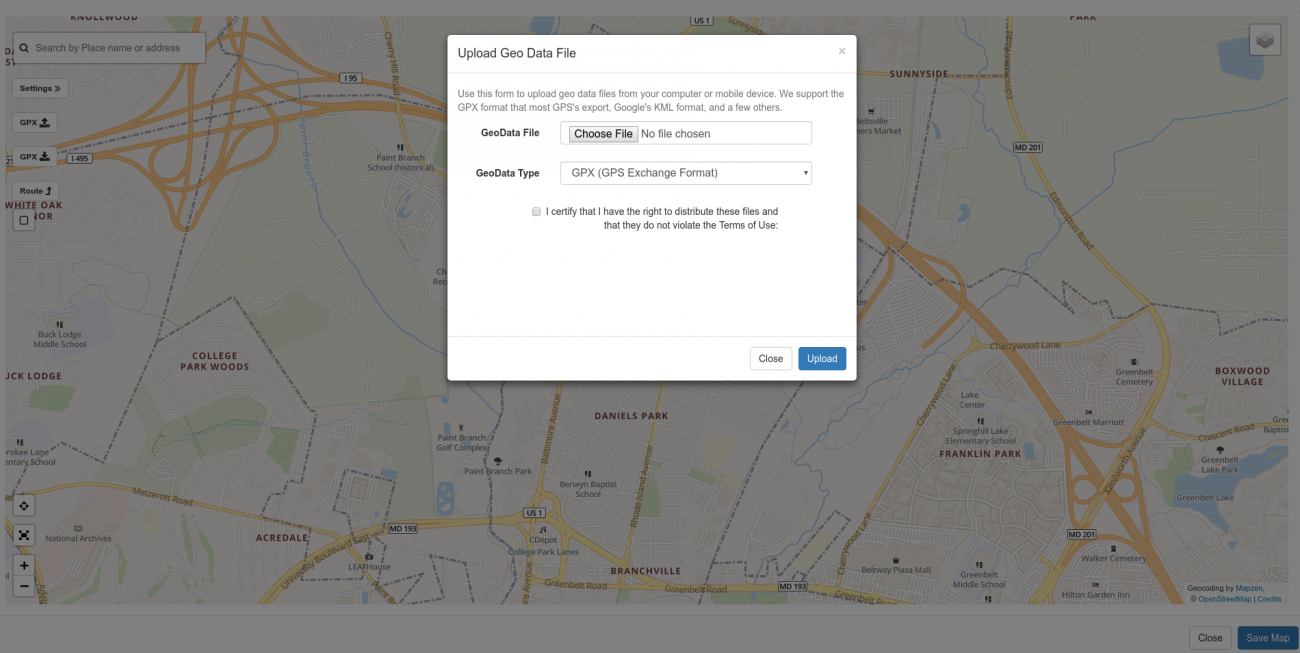
You should then see the contents of your GPX file rendered on the map. Depending on how big the GPX file is it may take a few moments for the map to render.
A Note About GPS Favorites
On Garmin GPSes you can mark places as "favorites" which you can then use as destinations when getting directions. For example, one special favorite is the "Home" favorite which marks your home location.
When the GPS generates the GPX file, it includes ALL the favorites, routes, and tracks that have been entered into the GPS.
So chances are you're going to want to remove some things before you save the map.
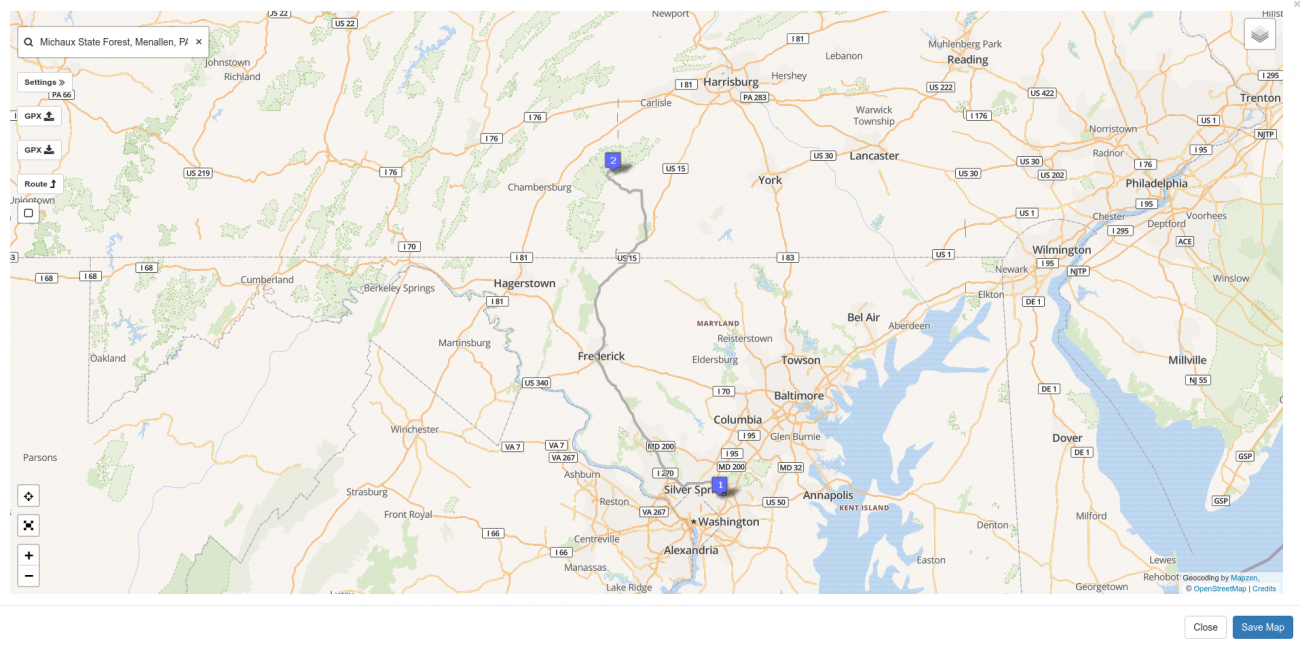
For example, here's a map that was created from a GPX that came directly off my GPS on my last ride up through Dover, PA. You'll note the blue marker.
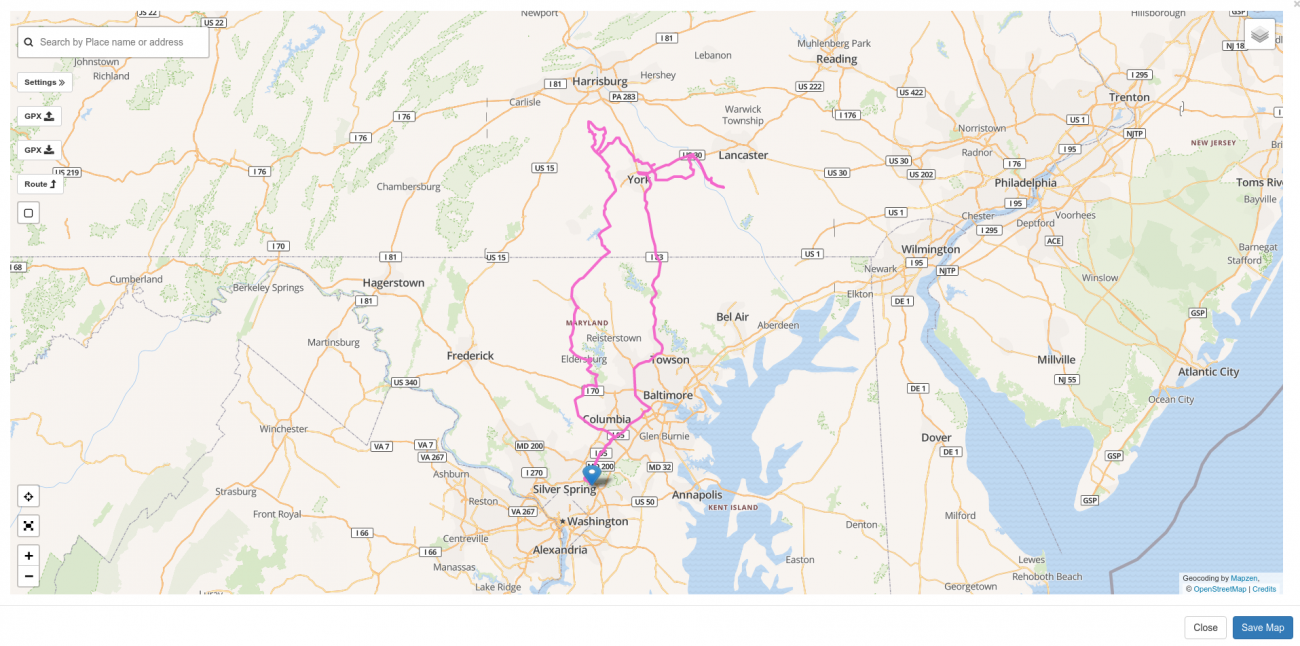
You can click on the blue marker to get more information about it.
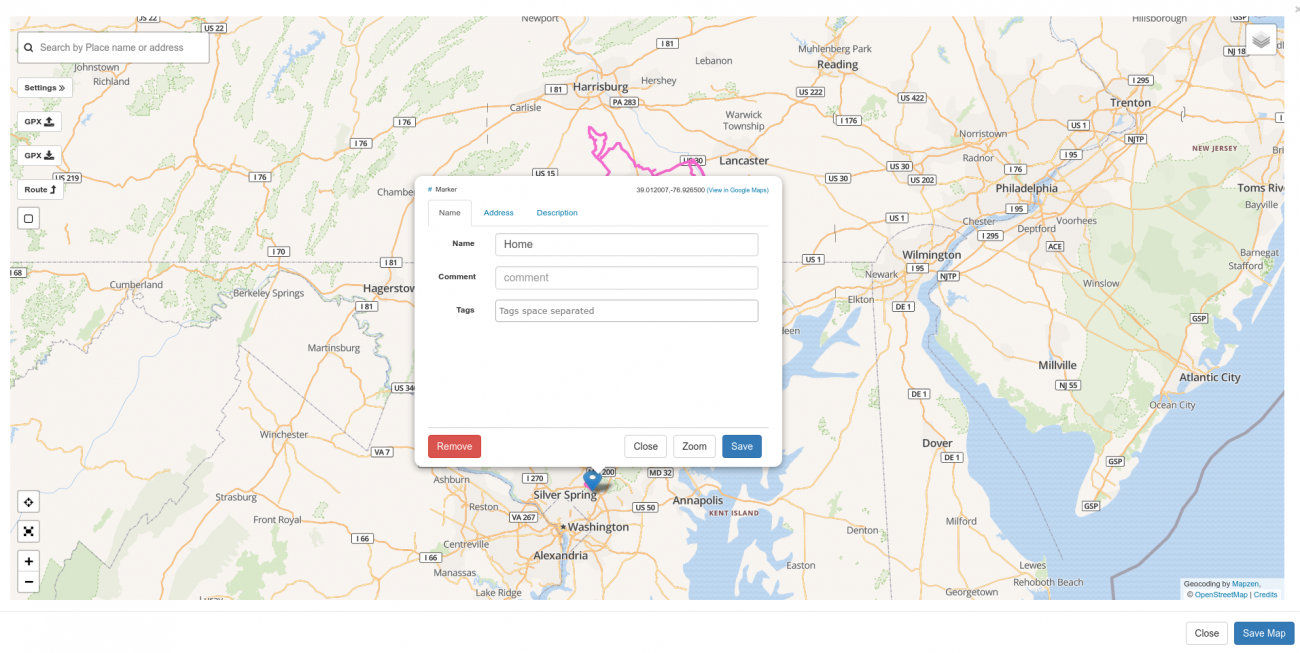
Clearly that marker needs to go.
Removing Unwanted Markers and Track Segments
Removing markers is as simple as clicking on them to bring up the marker popup and selecting Remove.
GPSes tend to break tracks into segments. Sometimes you may want to just delete a whole segment. You can just click on the track and select Remove to remove the entire track segment from the map.
You may also want to just cut out small sections of a tack. For example, you may not want a track you post to start and end exactly at your front driveway. The GPS starts recording as soon as you turn it on. If you're like me and turn the thing on in the garage and turn it off again in the garage, you may want the ability to cut out a section of the track so as not to show the exact location of your house or the location of friends you visit. (This has been a frequent request when I visit friends.)
The fifth button, a square, under the location search bar lets your select regions on the map to delete.
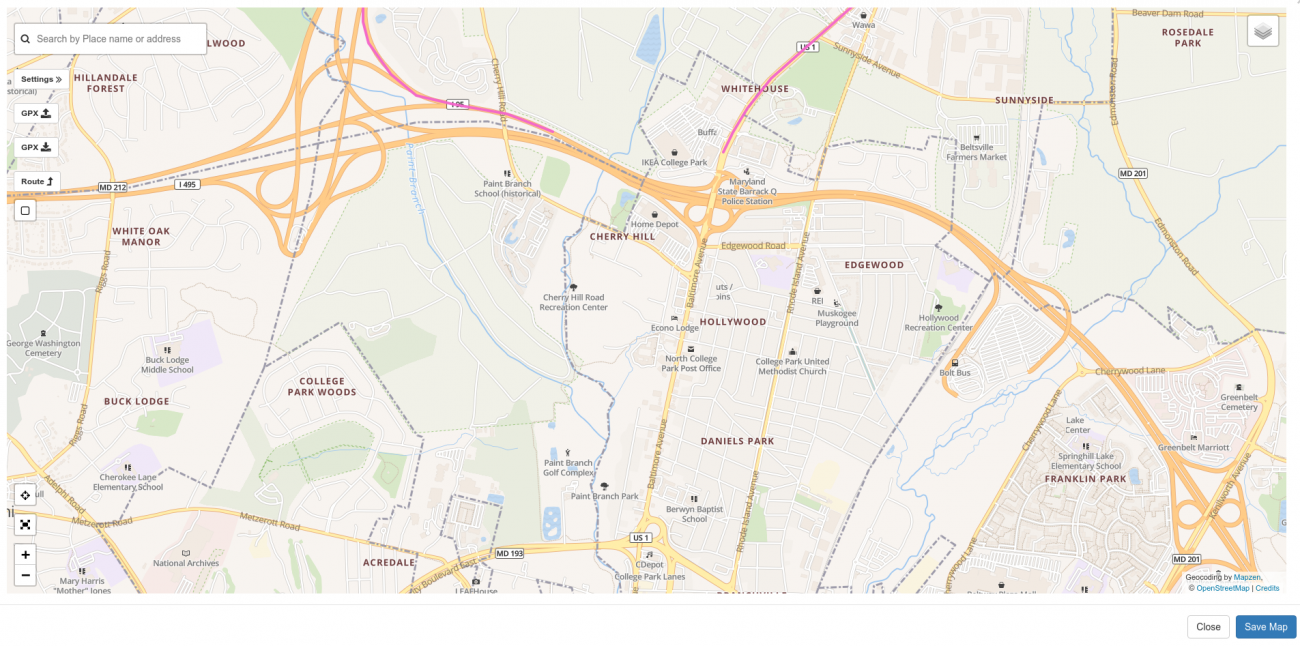
Just click the button. Then click and drag to draw a box around the area you want removed. Then click the scissors button.

After that, you should see the track cut out.
You can also use the scissor tool to cut a track into two separate sections which is sometimes useful especially if you're building a library of good roads or offroad sections.
Routes
There are two central concepts to GPS navigation which often confuse people.
There are "routes" and there are "tracks". The two are different and how you interact with them, because of they way they are represented, is different. As I mentioned, I wrote an article that describes the differences between routes and tracks.
Typically, you'll start out by creating routes. Routes are created by clicking on the map to add waypoints at various places through which you want the route to go and then asking the routing engine to plot a route along known roads that includes those waypoints as closely as is possible.
You can also upload routes contained in GPX files however you should be aware as explained in the article linked above that different GPS units and routing engines may choose different routes for a given set of waypoints.
Tracks typically come from GPX files and are record of your actual travels. During the planning phase you create routes. During the ride you record tracks of the actual path you took. In the story/ride report phase you upload the recorded tracks from your GPS onto a map. This doesn't cover every possible use but it's a way to conceptualize the difference.
So one way of thinking about the difference between routes and tracks could be:
- routes - the best laid plans of mice and men
- tracks - documentation of your misadventures
I also use routes to:
- keep track of roads I'd eventually like to ride (which I tag with #todo).
- keep a library of my favorite roads.
- recommend roads to others.
- plan my rides.
Planning a route is straightforward. It consists of:
- clicking on the map and dropping waypoints at the points you want the route to travel through.
- adding, moving, or deleting waypoints if the route the routing engine has chosen isn't to your liking.
- describing and tagging the route
Then, if you want to provide even more information about the route especially if you're documenting a truly great road you'd like to share with others, you can curate it by adding photos, videos, points of interest, and links to it.
Creating a Route
To create a new route on a blank map, find the starting location for your route. For example, let's say I want to plot a route from the Starbucks in College Park to Michaux State Forest in Pennsylania.
If you don't have a map open (in another tab in your browser), click on Groups at the top, select Miles-By-Motorcycle Public Group. Select the Maps Tab. Click "New Map".
Find the Starbucks in College Park, Maryland by typing in 'starbucks, college park, md' in the search bar and press Enter.
Select the "Starbucks, College Park, Md" entry.
A marker will be placed on the map and the "map click popup" will be displayed.
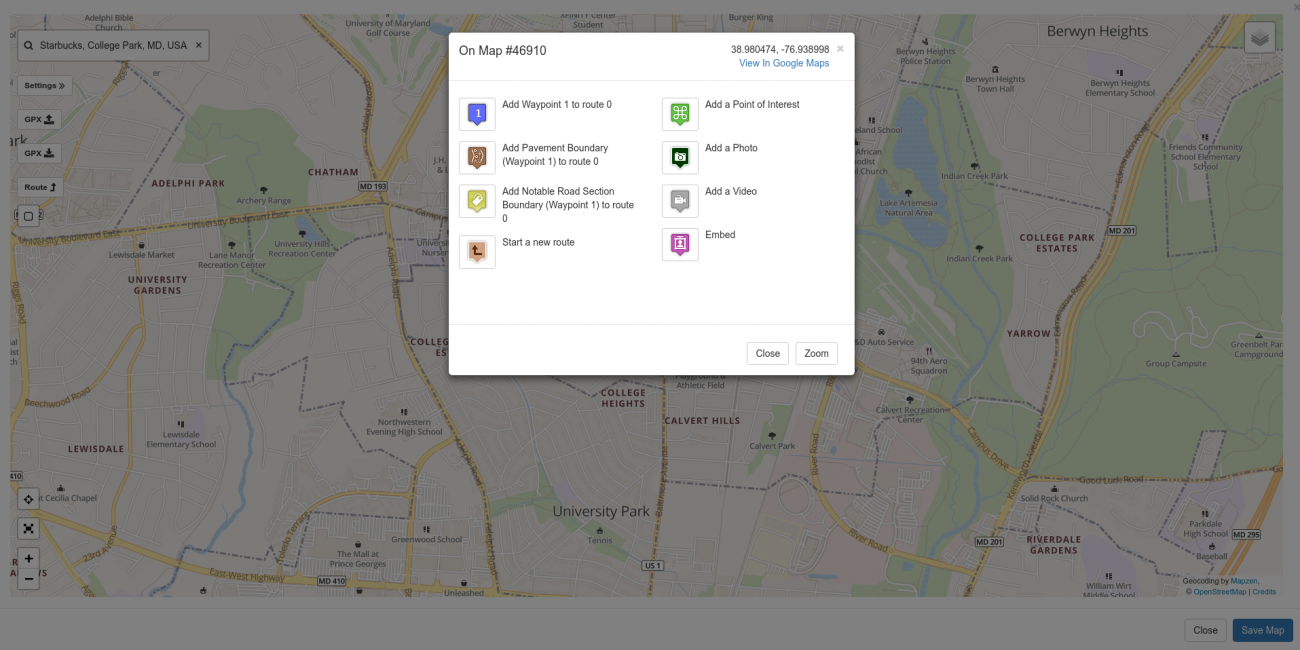
Click on the "1" icon in the upper left labelled "Add Waypoint 1 to Route 0". A waypoint marker will be dropped on the map.
Now type in "Michaux State Forest, Menallen, PA" into the location search bar, press enter, and select it from the list.
A marker will be dropped in the middle of the forest and the same "map click popup" will be displayed.
For this example, there's a road called Dead Woman Hollow Road, which if memory serves is unpaved, just North and West of where the marker is dropped. Close the popup. Zoom in and then drag the map over until you see where Dead Woman Hollow Road and Route 233 intersect.
Sometimes you can use the satellite view to see if a road is paved or not. There is a satellite view available in the map editor. You can display it by clicking on the box in the upper right corner of the map (called the Map Layers Box) and selecting "satellite view".
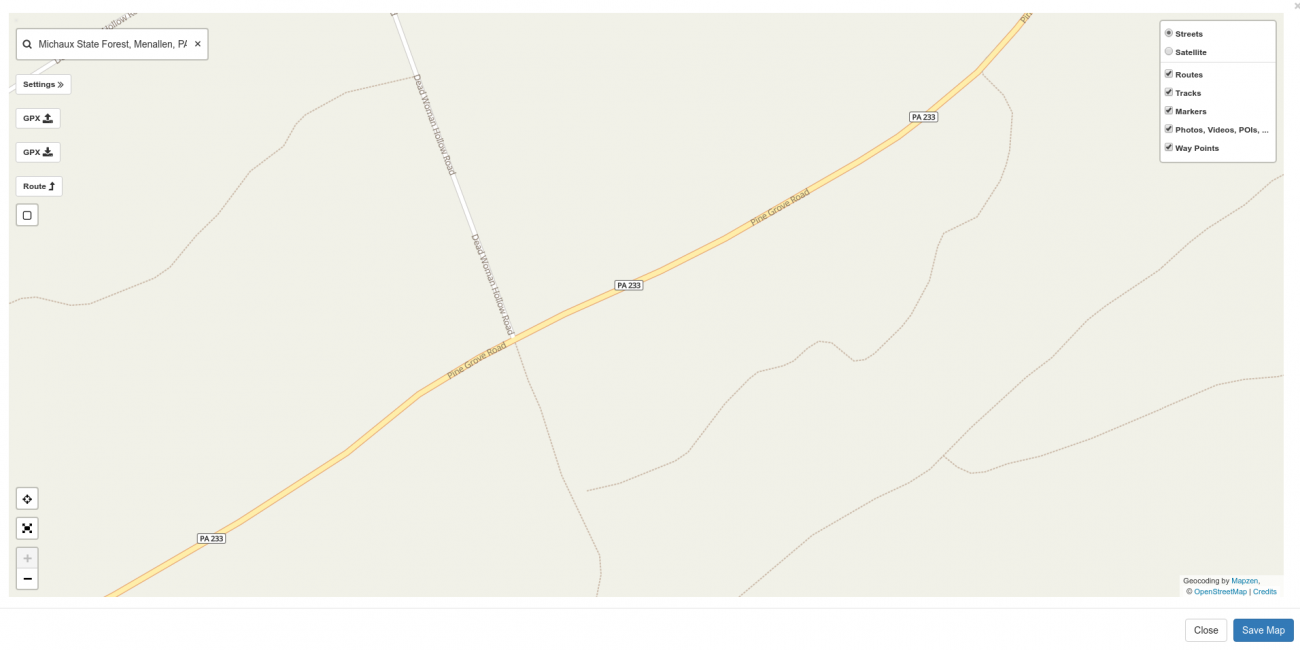
Satellite imagery is provided by Mapbox.
Later, once the map is populated with routes, tracks, POIs, photos, etc you can also use the Map Layer box to show and hide types of items which is sometimes useful if you're trying to get the name of a road under a rendered route.
To continue with the example for our route, click on the map where Dead Woman Hollow Road meets Route 233 to open up on the "Map Click Popup" at that location.
Note that the latitude and longitude of the point where you clicked is listed in the upper right of the popup. In addition, there's a convenient link to Google Maps in case you want to compare and contrast between the Openstreetmap data we use here and Google's data. Oftentimes, Google's satellite imagery is better than what I have access to.
Now to calculate a route from the Starbucks in College Park to this location on Route 233, click the "2" icon in the upper left labelled "Add Waypoint 2 to Route 0". A waypoint will be dropped on the map and there will be a slight delay as the route engine calculates a route. If you zoom out slightly, this is what the calculated route should look like:
You can click on the route to bring up the Route Properties Popup.
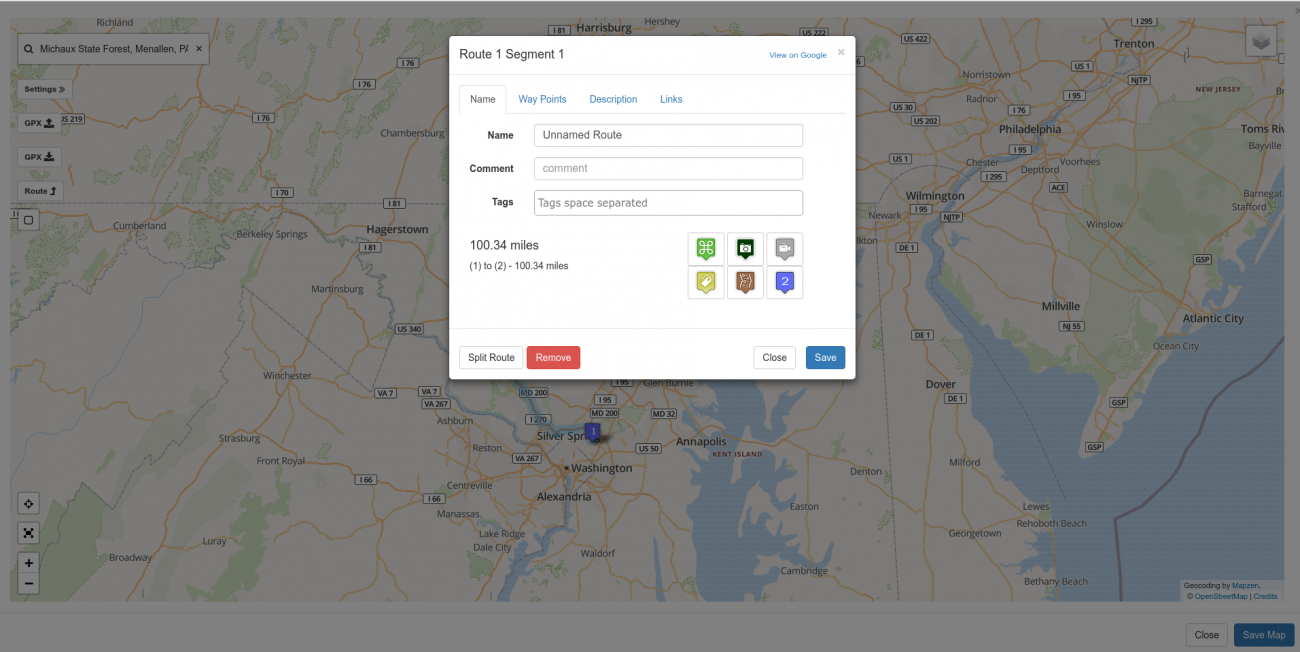
Here you can see that the calculated route is 100.34 miles long.
On this popup, you can name your route, provide a short descriptive comment suitable for display on a GPS, and a set of tags (as discussed above) to make finding this route easier later on. (As is discussed later in this article, when the map is saved, the route will be saved separately as its own 'element' in the database which is what enables someone to click on it later and add it to a ride plan. This is also why it's a good idea to not only describe the map but also each element on the map individually.)
(It should also be noted, the "comment" feature is here solely because some GPSes have the ability to display the comment along with the route. It is NOT used in searching the site and, frankly, may be removed in a future release.)
When laying out routes, if you want to find them again later, it's best to come up with some descriptive title that will be easy to remember. If it's a particularly notable road (which frankly route 233 in PA is) you can describe it further on the Description tab and add some tags.
Inserting and Dragging Waypoints
We may find that we want to refine our route. Let's stay that before we go to Michaux we want to go through Mount Airy.
To force a route through a certain location, "insert" a route point along the route and then drag it to the new point.
Click on the route to bring up the Route Properties Popup.
Note the "2" icon in the lower right of the popup. (See photo above). If you hover over this icon you will see it says "Insert Waypoint 2".
Click the "2" icon.
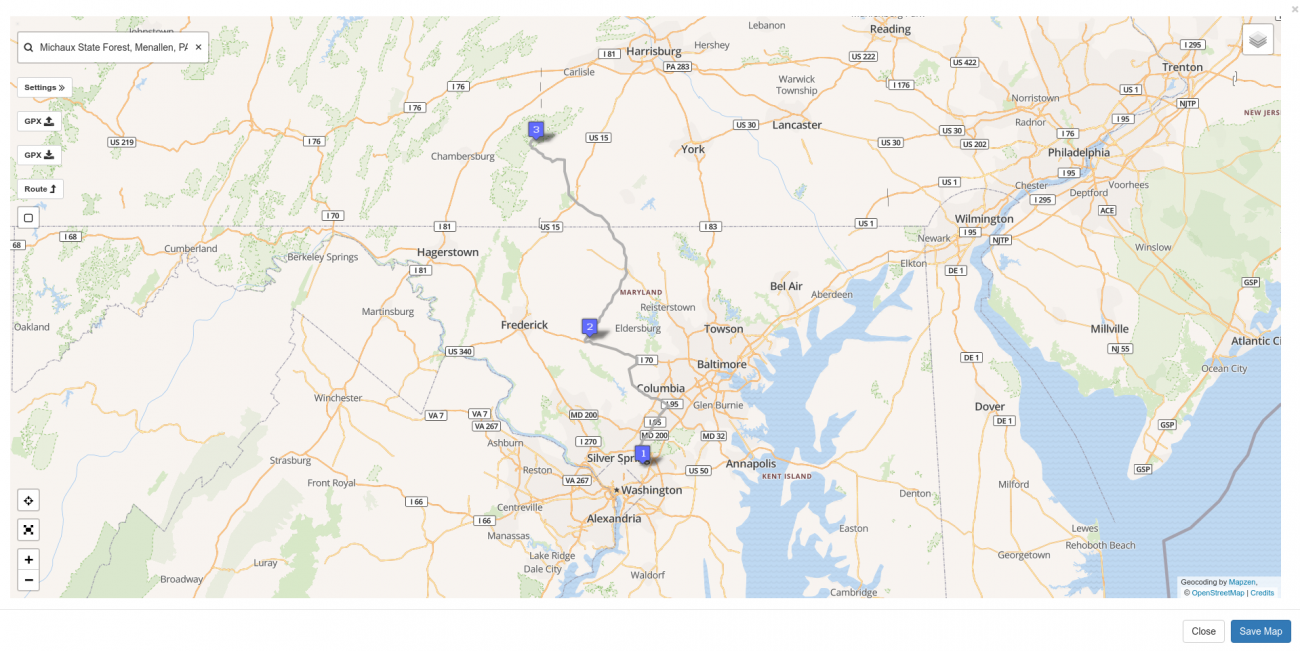
You will now see a "2" waypoint on the route and you'll notice the previous waypoint 2 at Michaux is now 3. Drag waypoint 2 over to Mount Airy (or where ever).
Once you've dragged the marker you will see that the route is recalculated to take the new waypoint into account.
If you click on the route now, you will see the distance has updated. You will also note that it now shows you the distance for the route segment you clicked on in addition to the total distance.
If you click on the WayPoints tab you can see the distance of each segment. From the waypoints tab you can also reorder the waypoints. Let's say you wanted to head to Michaux first and then to Mount Airy. Just drag and drop the waypoints into the order you want.
If you want to add points to a route you can just click on the map and select the waypoint icon in the Map Click Popup to add a waypoint at that location.
You can drag any waypoint and the route will be recalculated.
You can insert waypoints to force the route engine to choose a particular route. This is often necessary if you're trying to get it to route across gravel, forest, or small country roads.
You can remove waypoints by clicking on them and selecting "Remove".
Unlike Google, there is no set limit on the number of waypoints you can have in a route but practically speaking if you have more than 100 waypoints it can get quite slow.
Adding Multple Routes to the Same Map
You can have multiple routes on a single map. I find this useful if I'm trying to group together a bunch of road recommendations for a trip. For example, in 2013 I was planning a cross country trip and posted a question in the BMW MOA group asking for recommendations of good roads and places to see. For each road that was recommended I would create a new route and place it on my planning map:
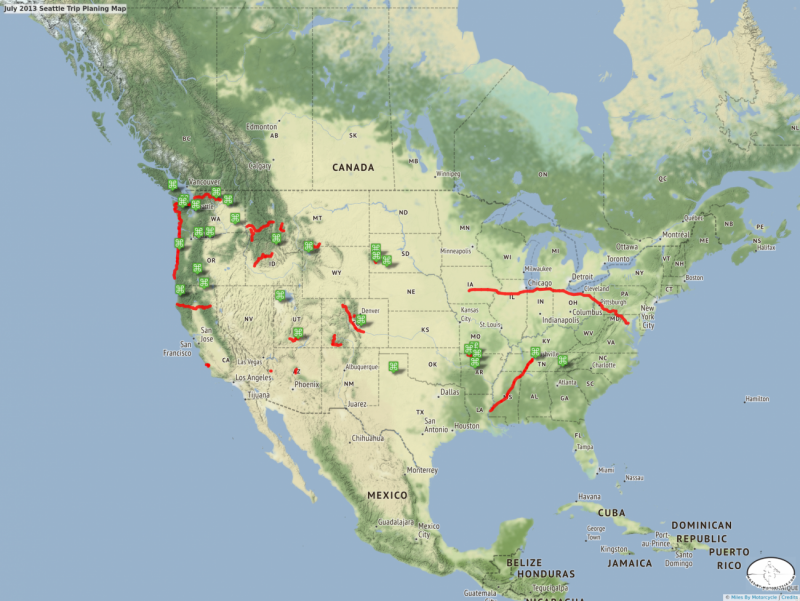
July 2013 Seattle Trip Planing Map
A little bit of route and sight planning for the upcoming 2013 Seattle Trip.
To add a new route to a map, click on the map where you want to start the new route and then click the "Start a New Route" icon. A new differently colored waypoint 1 will be added to the map.
Now when you click on the next location on the map, the next waypoint in the series for that route will be added.
If you decide you want to add a waypoint or make some change to one of the other routes, just click on that route. That'll set the "current route" to that one.
You can also use the Route icon on the left of the map to switch between working on different routes or starting a new one.
Splitting Routes
Sometimes the situation arises, especially when trying to create a curated library of the best roads, where you might want to split a route in two.
To split a route into two routes, simply click on the route where you would like to split it and click the Split Route button in the route popup.
Both routes will share the title, description, and tags. However, the second one will add "(from split)" to the title and automatically add the tag "revisit_split". This is done because if you are curating a thousand or so roads, it's easy to lose track of routes you've split and failed to go back and edit.
Deleting Routes
You can delete sections of routes by removing waypoints. You can remove an entire route by clicking on the route and clicking the Remove button.
Oftentimes, when uploading a GPX files it'll include routes that you don't want on your map. (I ran into this problem endlessly while on the Trans Am Trail trip as I had Sam's routes on my GPS but since they are commercial and proprietary I did not want to upload them.)
Curating Tracks and Routes
There are plenty of sites where you can download simple tracks and routes. However, I find most of these lacking because when I look at a given track there's no mention of why I might want to ride that section.
A big part of the mapping system on Miles By Motorcycle is to create an organized and curated library of roads and destinations, each adequately answering the question "why would I, a motorcyclist, want to ride this?", that I can use to create ride plans.
I want to know more than just that there's some road. I want to get some insight into why I might want to add it to my plan and ride it. To enable this, tracks and routes can be "annotated" to provide much more context for the motorcycle traveller.
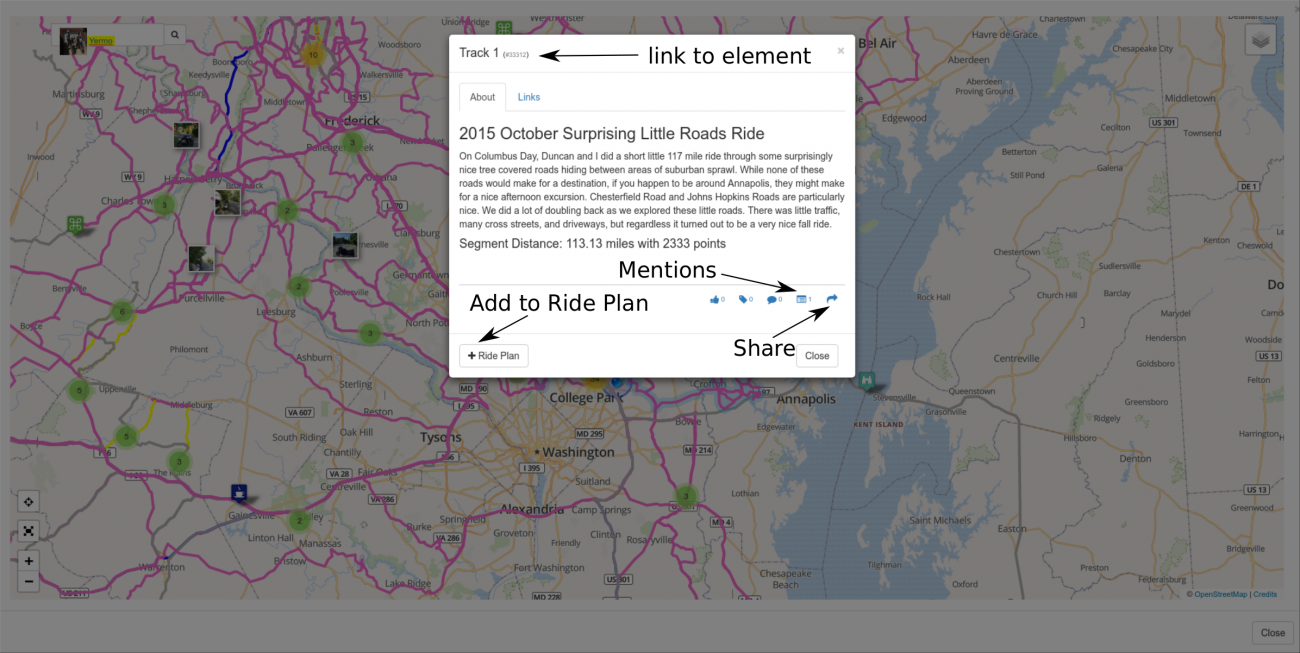
If you click on a track or a route, the properties popup will appear. For example the track properties popup looks like this:
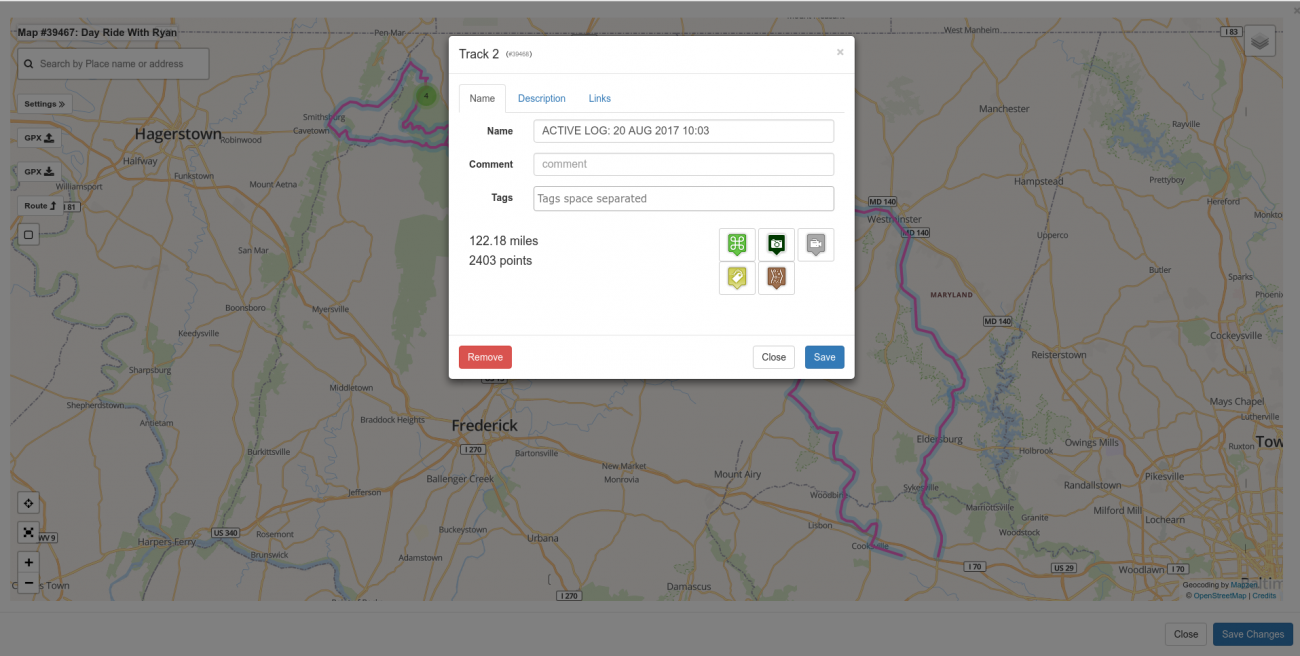
Similar to the map settings slideout, the properties popup lets you add a title, a comment, a set of tags, a description, and some related links. If you have a notable track or route that you'd like to be able to easily find again or share with others you should give it a descriptive title.
The comment is intended to be a short line of text that some GPSes can display. (As of this writing, the comment line is not used when searching on the site. See the description tab.)
As mentioned above, tags are a central theme on the site useful for helping you organize your tracks and routes so you can find them more easily in the future.
The description tab allows you to add a longer more descriptive block of text intended to include more detail about the track or route and why one might want to ride it. The description field is also used when searching the site.
Highlighting the Best Sections
One thing I have always wanted to be able to do is to mark the best roads that I've ridden. Most often, these best roads are just sections of bigger rides.
Highlighting the best sections works for both tracks and routes.
If you have a route or maybe track from your GPX file that includes a truly awesome section, click on the point where the best section starts.
Then click the yellow tag icon:
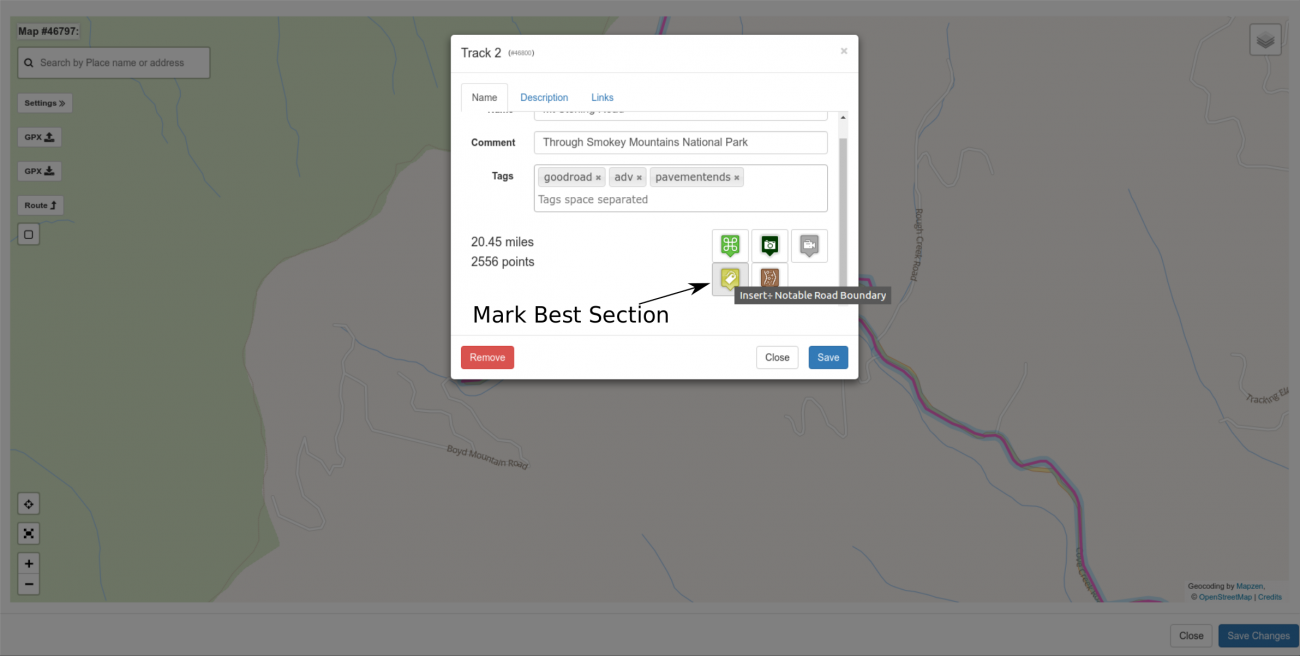
Once you click the icon, the track from the point where you clicked until the end will be highlighted in yellow.
Now click on the point where the best section ends and once again click the yellow best section icon.
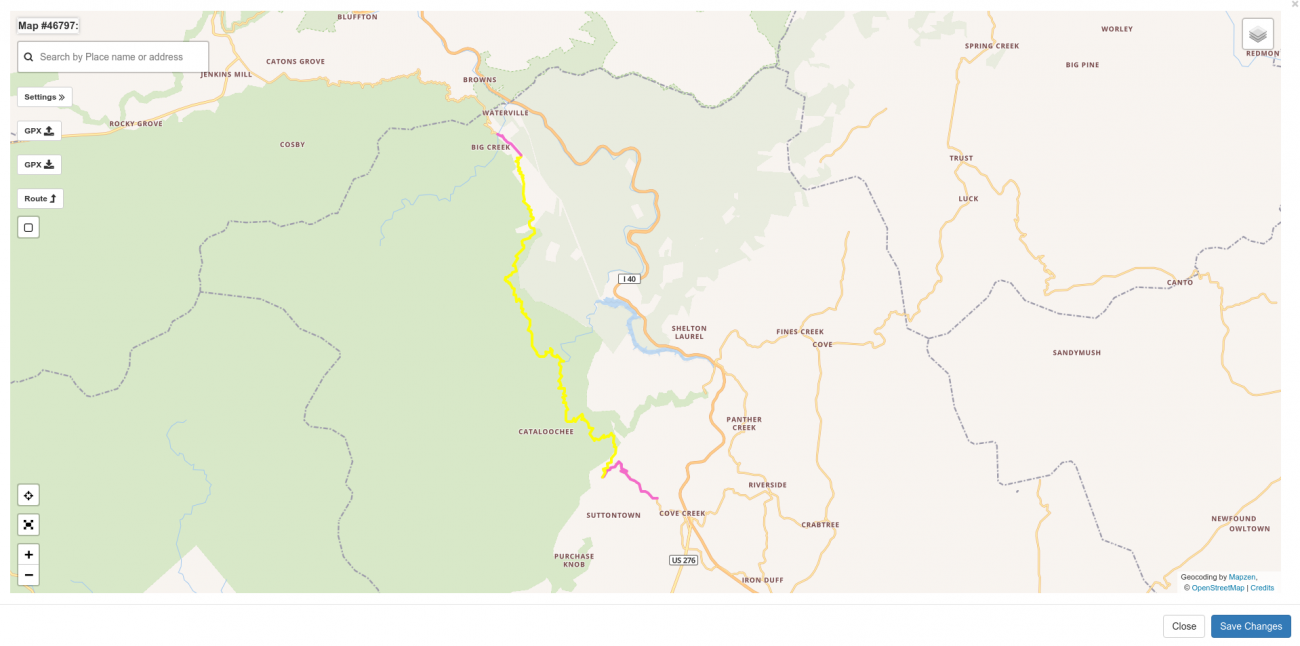
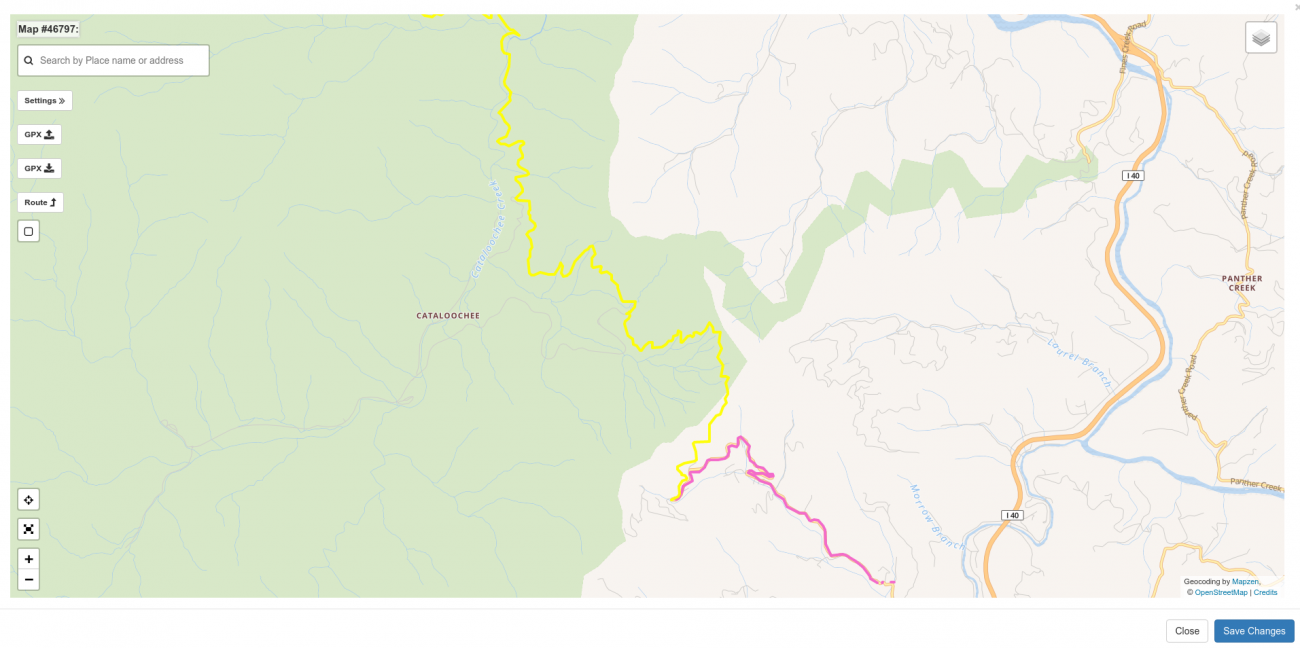
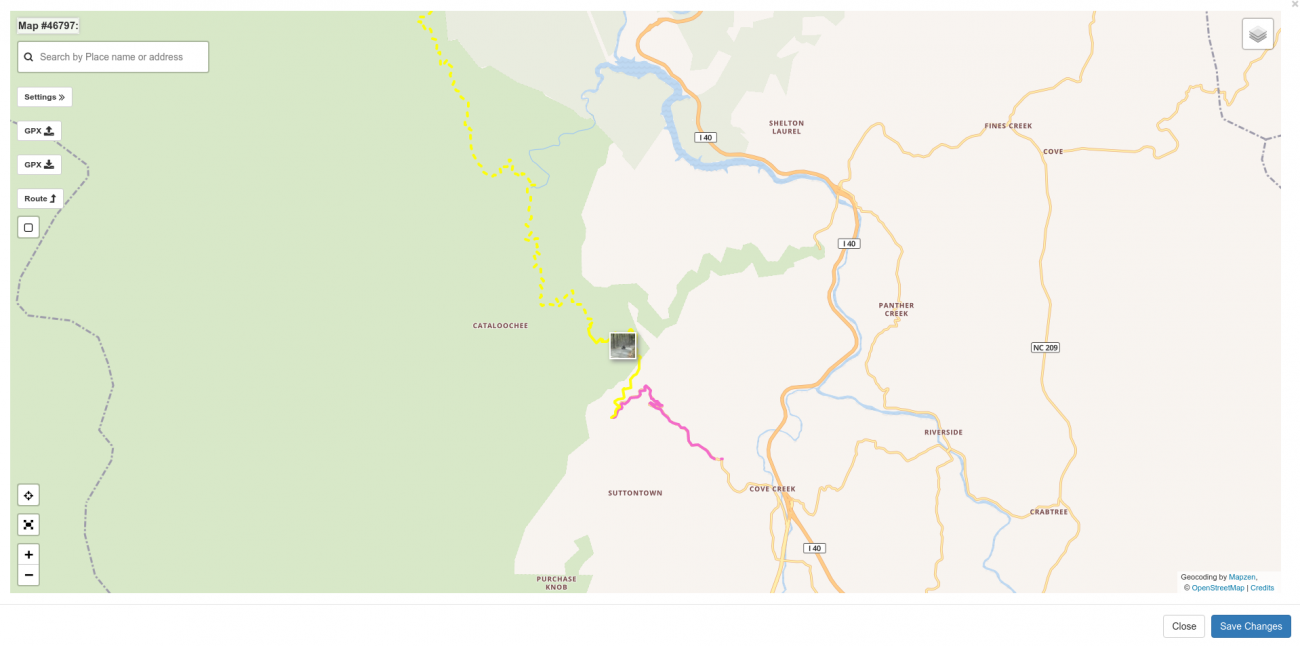
You will now notice that the best section is of your route is clearly highlighted in yellow. In this way, when looking at a route or a track, the best sections of the road are immediately visible. In the above example, Mt Sterling Road through the park is a truly fantastic road. However, much of it is unpaved.
Highlighting Unpaved Sections
Another thing I wanted to accomplish with Miles By Motorcycle was to create a library of legal unpaved roads that I and my buddy Duncan could ride our Suzuki DR650SE's on.
Marking an unpaved section of road works just like marking a best section.
Click on a route or track where pavement ends and then click on the brown Gravel Road icon in the popup. You will notice the line of the route or track change to dashes from that point until the end.
Then click on the point where the pavement starts again.
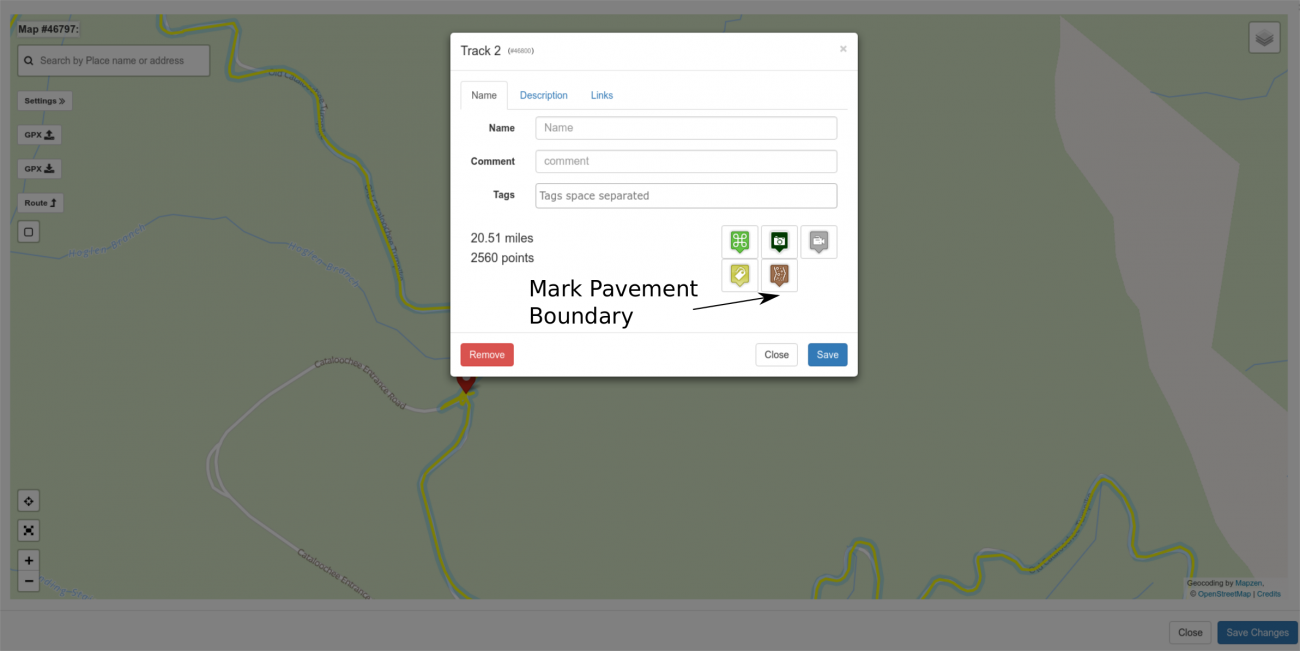
You'll notice that it's possible to combine "Best Road" with "Unpaved Road" making a "Best Unpaved Road" which this route through the park definitely represents.
Some Notes on Best Sections and Pavement Boundaries
The way Best Sections and Pavement Boundaries work in routes is slightly different than in tracks.
In routes, the best section and pavement boundary markers are actually waypoint markers. This means that you have the flexibility drag them, delete them, insert them, etc.
As of this writing the support for annotating best sections in tracks is incomplete because there is currently no way to change the boundaries on a track once they have been set. The only option is to delete it, upload the track again, and place the markers again.
The way best sections and pavement boundaries are handled will be dramatically improved in an upcoming release which should be availabe in the first quarter of 2018.
Adding Points of Interest (POI)
In any motorcycle trip, there will be points along the way that are notable. The Deal's Gap Resort. An overlook off the Blueridge Parkway. Waterfalls. Good restaurants. Camp Grounds. The Grand Canyon. Atigen Pass. Endless others.
The Miles By Motorcycle mapping system includes the concept of a Point of Interest which is a way to represent these notable points on a map. Each point of interest is marked with an icon.
Points of interest can be "free floating" on the map or associated with a track or a route. If associated with a track or route, that POI will be displayed along with the track or route whenever the track or route is mentioned. (See the sections on Saving and Searching below).
To add a point of interest, click on a point on the map or on a track or route and then click on the Point of Interest icon.
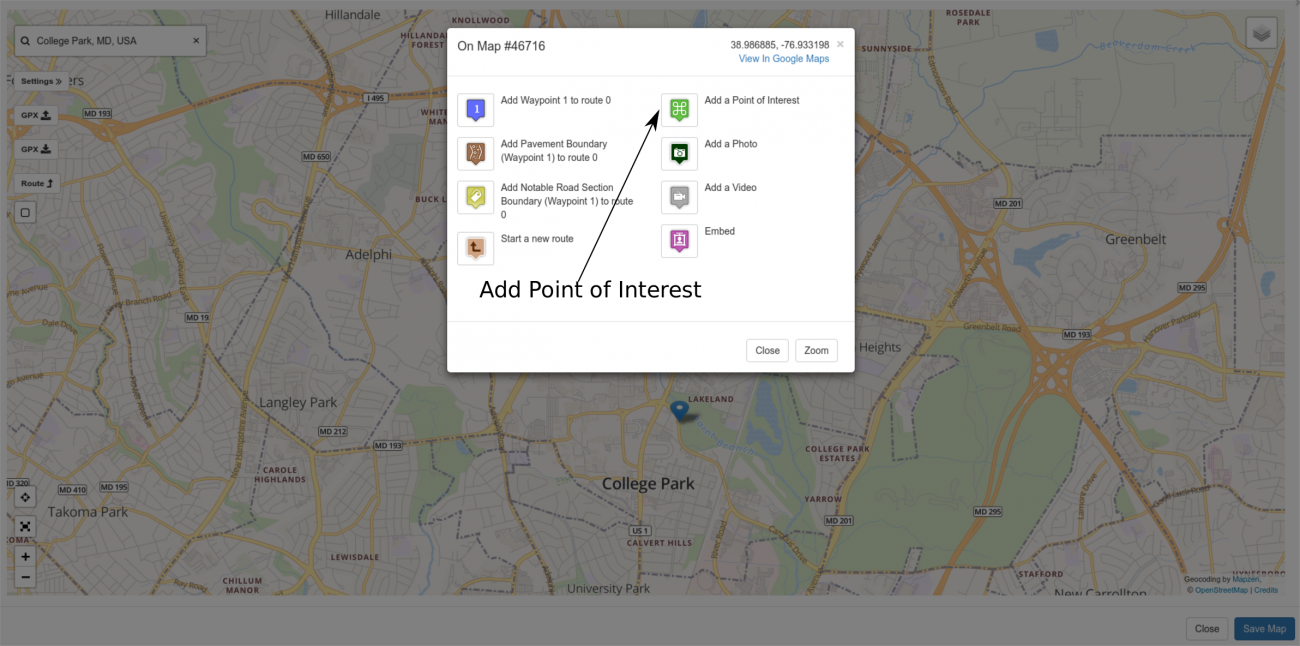
When you click on the icon, first the Miles by Motorcycle database is searched to see if there have been any POIs added close to the location where you clicked. In this way, I hope that duplication of points of interest will be reduced.
For example, if I click on the Starbucks across the street, which to my surprise I have not yet added I get:
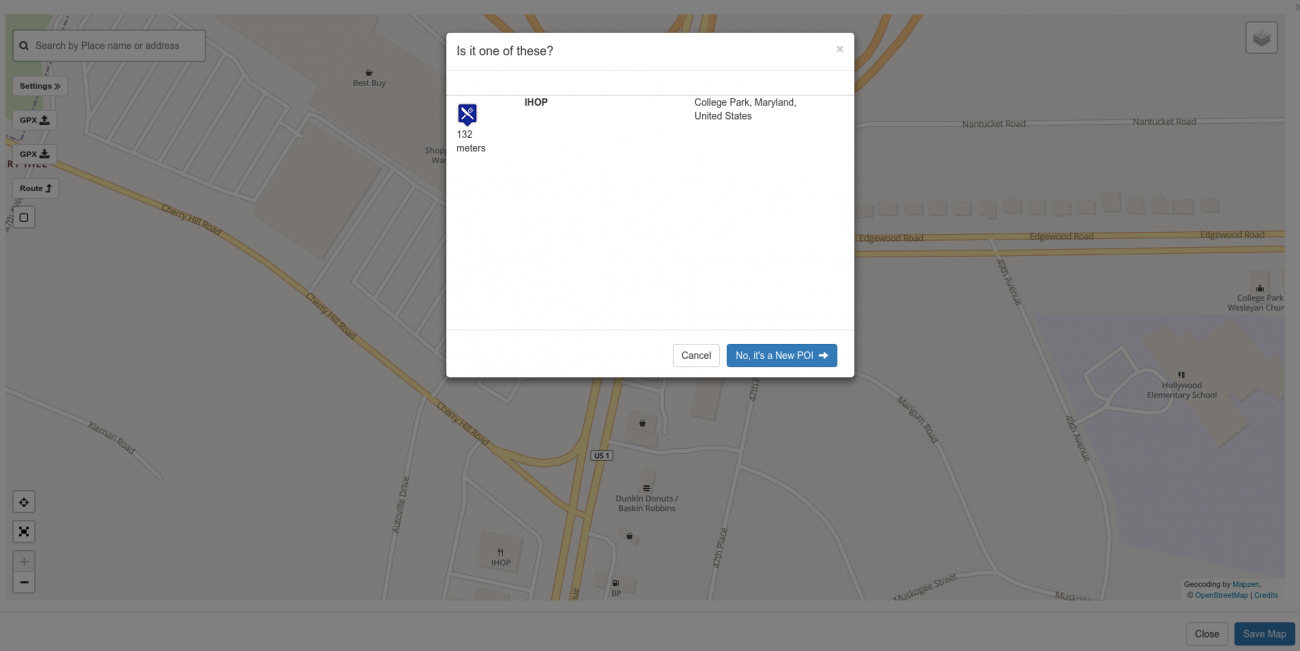
There's an iHop across from the Starbucks. In this case, it's not the POI I want so I click "No, it's a new POI" which leads me to the next screen:
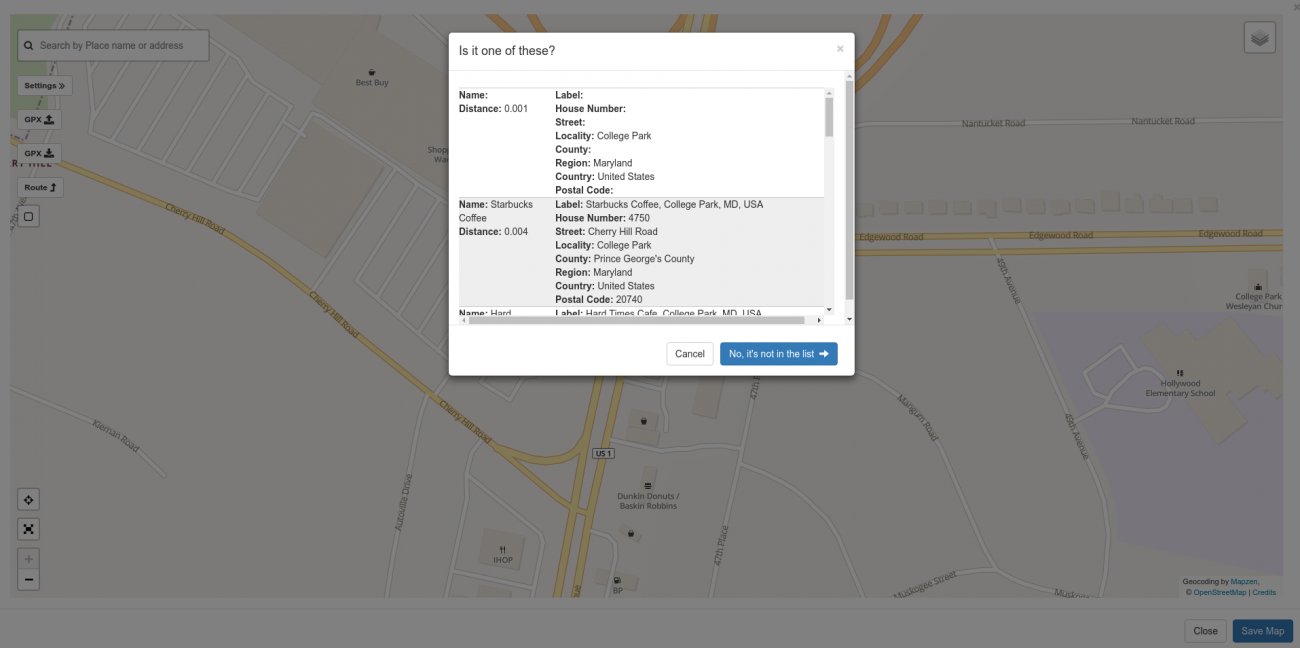
The address for the Starbucks is listed in the second position, so I click on the second item in the list. If it was not in the list, I'd click the "No, it's not in the list" button. In either case I am then presented with the Point of Interest type popup.
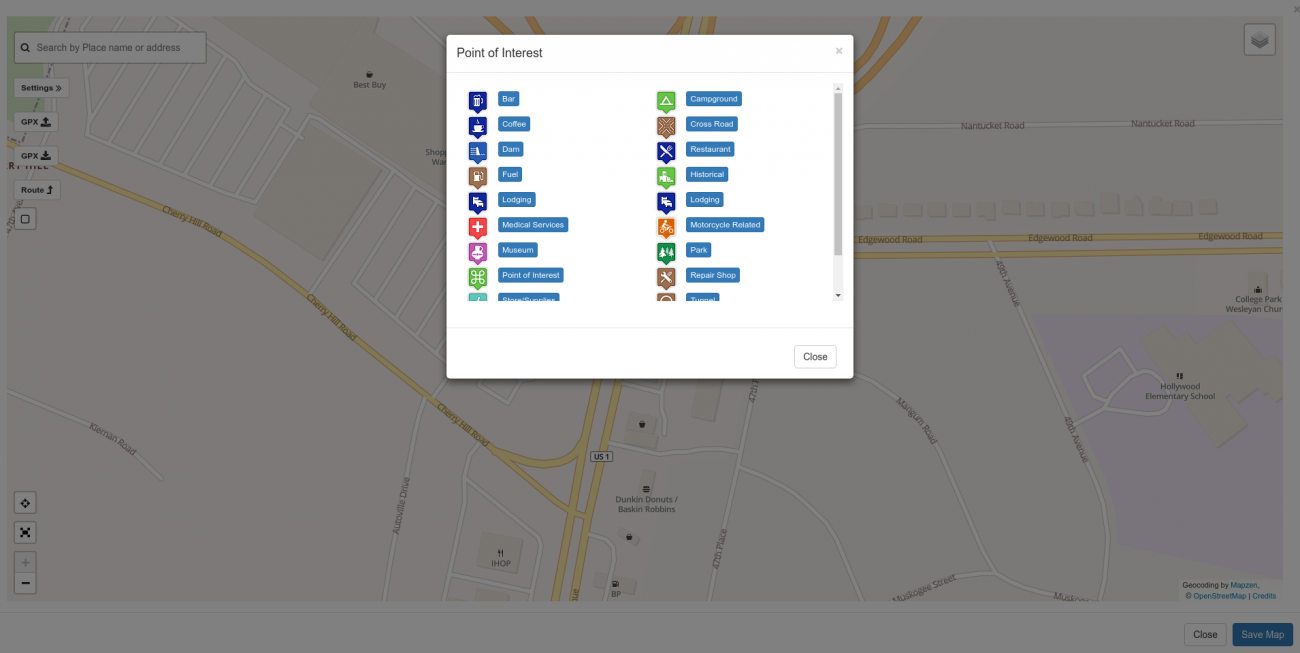
There are currently 20 different kinds of Points of Interest you can choose from. In this case, being Starbucks, I choose the Coffee icon. In the case where there's no appropriate icon just select the generic Point of Interest icon in the left list.
Once you click on one of the icons in the list, the point of interest is put on the map at that location. You can drag the POI to change it's position.
Once it's on the map, you can click on it to bring up the POI Properties Popup where you can add some information about the POI in a fashion simllar to others items discussed earlier.
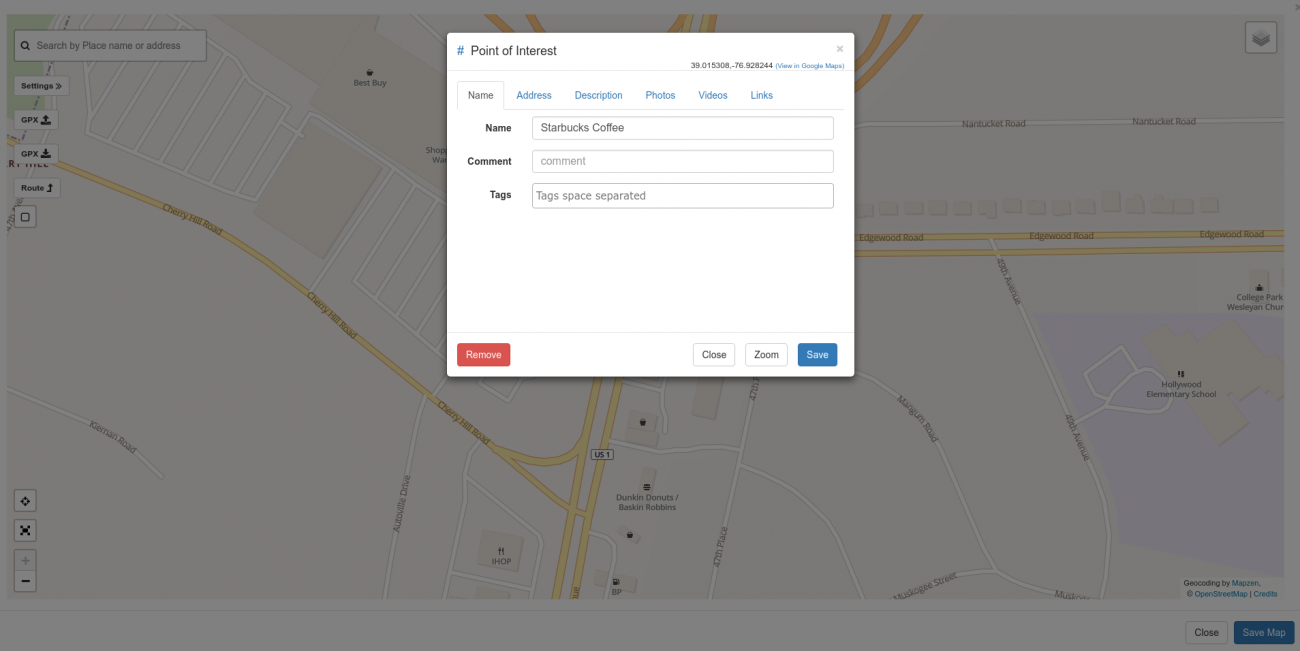
Similar to everything else in the system, here you can edit the title, comment, tags, and description of the POI. You can also elect to remove it from the map.
POI Extra Information
You will notice that on the Point of Interest Properties popup there are three additionals tabs:
- Photos
- Videos
- Links
In the case where you're adding a point of interest that represents a place you think others might want to go, offering additional information about that place to let the rider know why they might want to go there can make the POI entry much more compelling and useful. To this end, you can add photos of the place, videos from Youtube or Vimeo, or related links from the Web.
Adding a Photo to a POI
You may add any number of photos to a POI. Select the Photo tab and then click Add Photo.
From there click "Add Files" and select the photo from your computer or phone to add to the Point of Interest Entry.
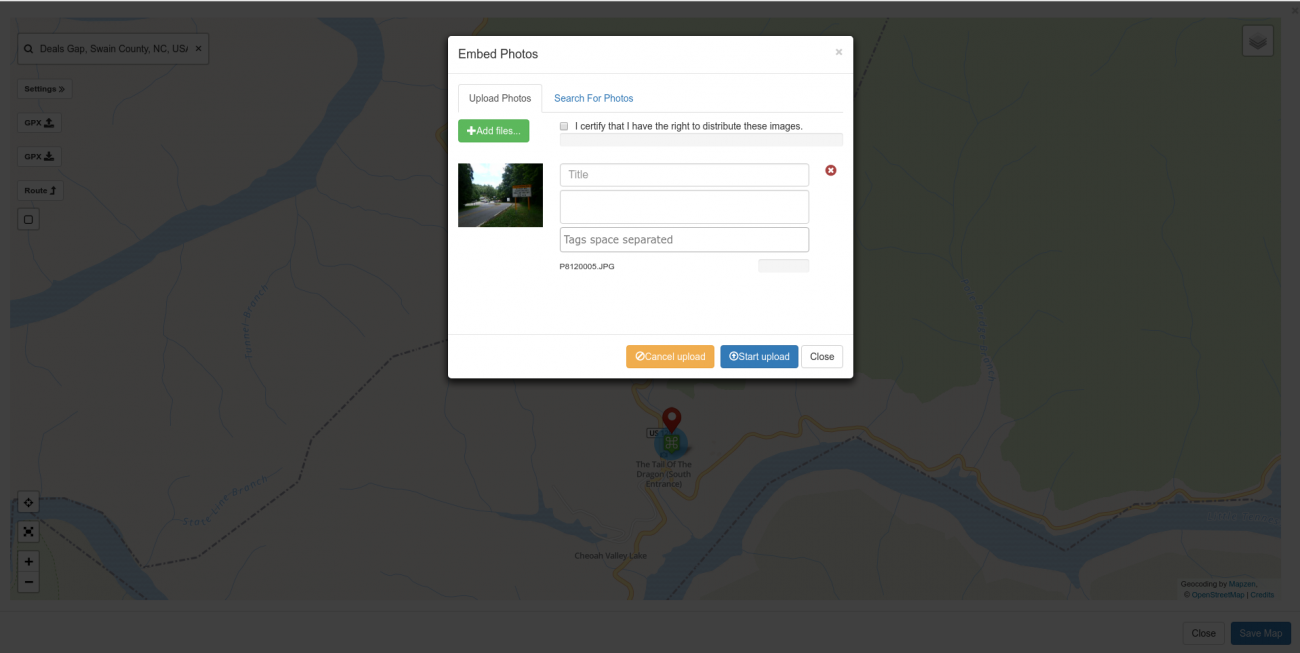
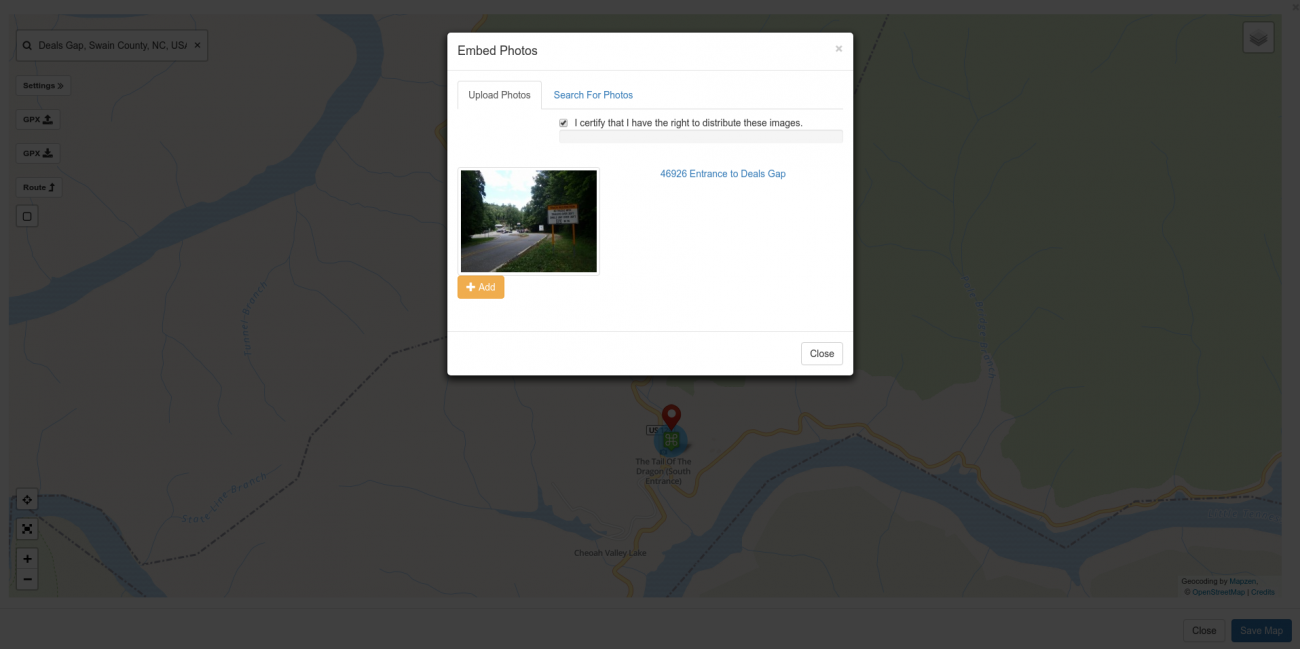
Once selected, you have the opportunity to add a title, description, and some tags to the photo. Once you're done, click "Start Upload".
The progress bars will move as the photos are uploaded. Once uploaded, each photo will be displayed with an "Add" button next to it. Click each add button to add it to the post. (NOTE: I hope to improve this.)
Once you click add, the photo will appear in the POI Properties Photo tab.
(NOTE: There is a bug here in that when you click the Add button there is no feedback. I will fix it. Click the Add button for each photo then click close.)
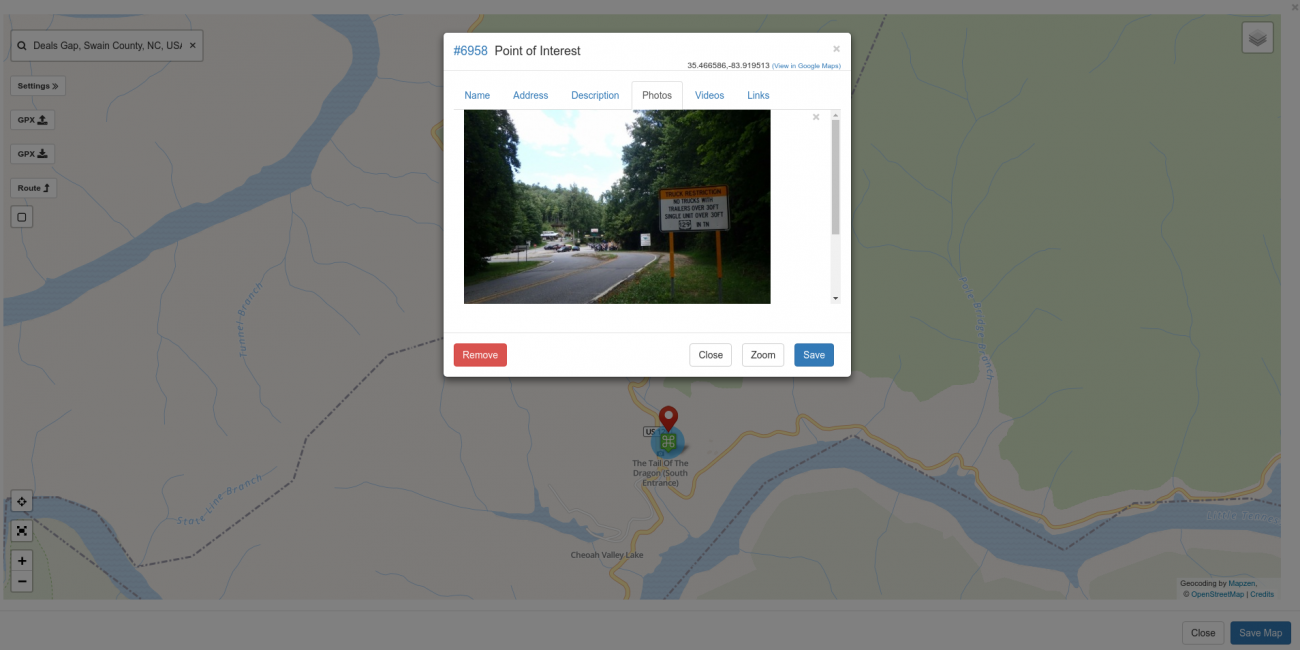
Click Save on the POI properties popup.
NOTE: See Saving and Searching below. At this point the photo has been uploaded and an entry for it created in the database (meaning it will be available in the Photos tab in the group or in your personal photos if you're creating the map under your profile). However, it will not get associated with the Point of Interest until you save the map.
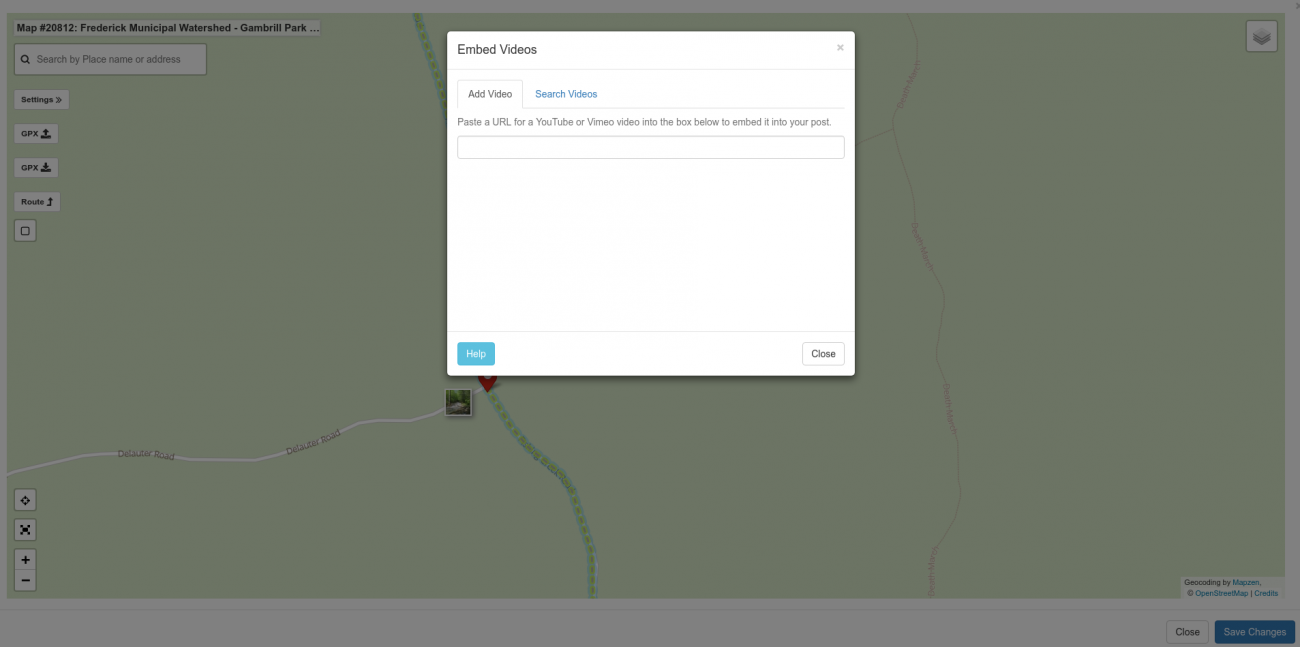
Adding a Video to a POI
If you select the Videos tab on the POI properties popup, you can add YouTube and Vimeo videos to the Point of Interest.
You have to first upload the video to YouTube or Vimeo. Once you've uploaded it and have the URL for it you can elect the Videos tab and then click the "Add Video" button.
Paste the URL of the YouTube or Vimeo video into the box. The site will fetch the details for the video.
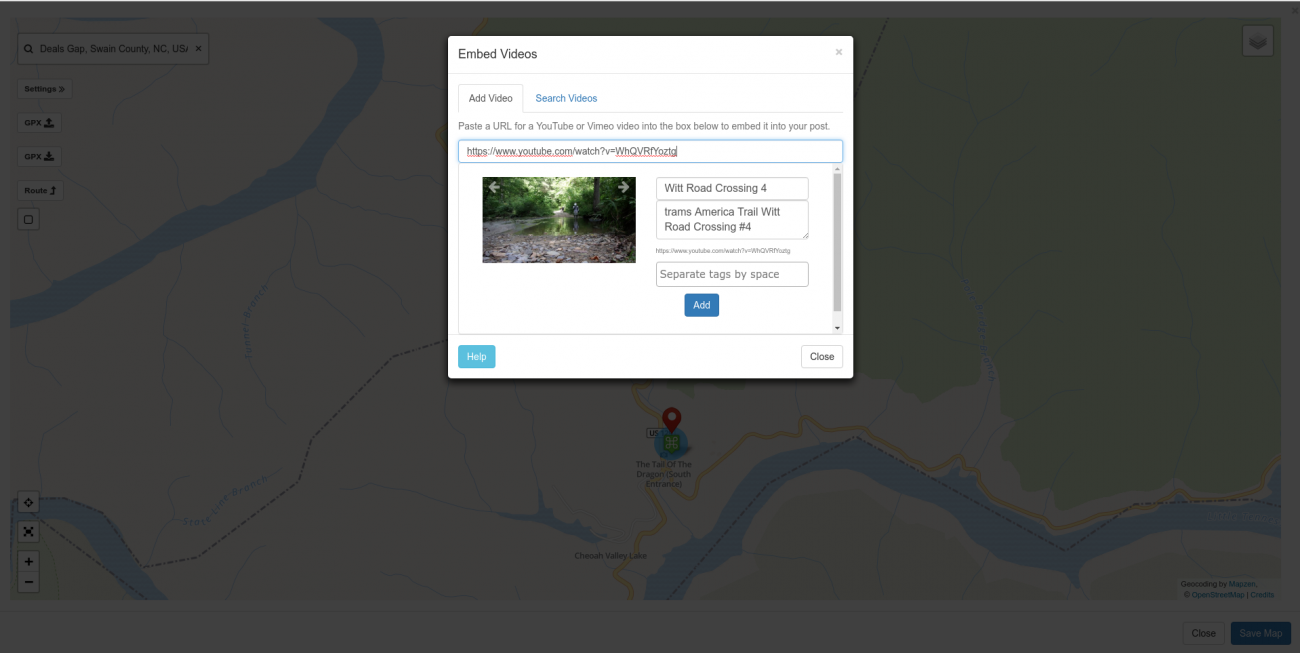
A carousel of images pulled from the video entry will be presented on the left. Title, description, and tags on the right. Edit and tag as you see fit and then click the "Add" button. Note that if you're working on a map in a group, the video will be saved in the group videos list as well.
Adding a Link to a POI
Adding links to POIs is the same process as adding videos. Click on the POI "Links" tab and click add link. Paste the URL for the link into the box and wait for the site details to be pulled. Pick a photo and edit the title, description, and tags to your liking and the click the Add button.
Links added to POI's will also be listed in the Links tab if the map is being added to a group.
Adding Photos to the Map, Routes, or Tracks
In a fashion similar to POI's, you can add photos "free floating" on a map or you can add them to a track or route. In either case the process is essentially the same.
Click on the map or on a route or track. Then in the resulting popup, click on the camera icon.
You'll be presented with a popup with an "Add Files" button. Click that to select photos from your computer or photo to upload.
As is the case with other things you can post to Miles By Motorcycle, you can add a title, a description, and some tags to your photo. Once you're ready check the "certify right" checkbox and then click Start Upload.

You must click that you certify that you're allowed to share these photos.
Once uploaded you'll be shown the embed screen.
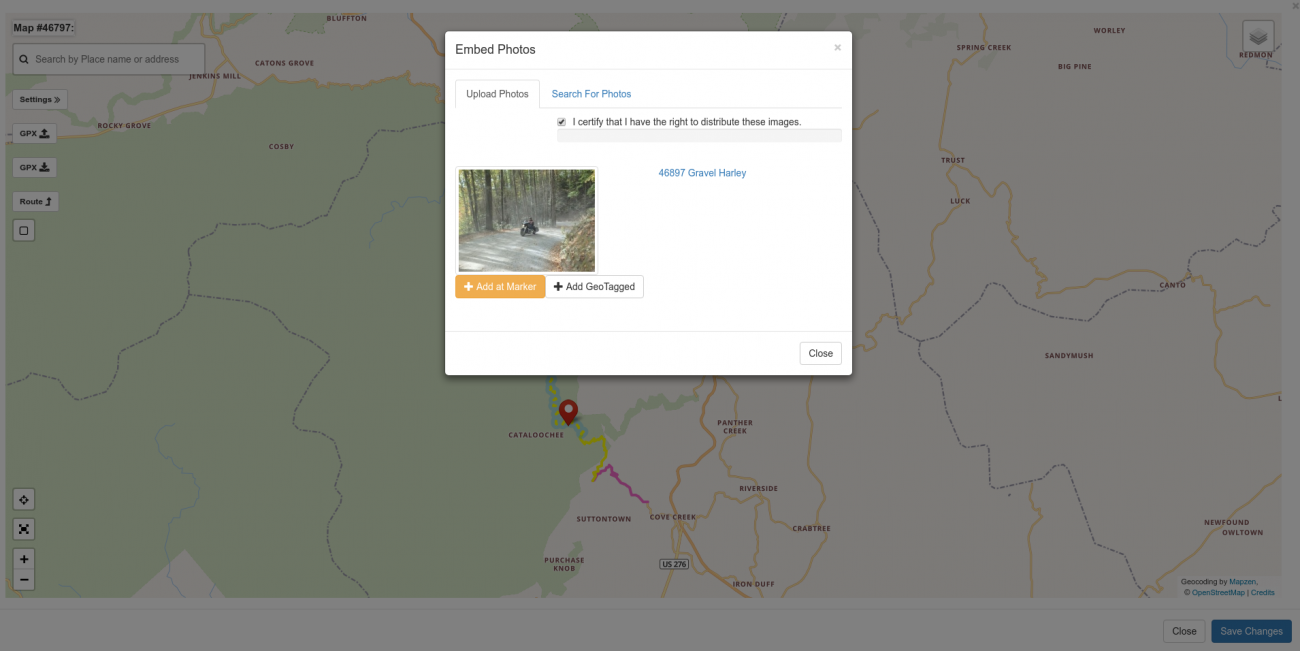
ADV Harleys. Gotta love it.
It should be noted that there are, for our purposes here, two kinds of photos:
- photos that include GPS location information (GeoTagged Photos)
- photos that do not include GPS locaiton information.
Your cellphone and many cameras on the market today have the option of embedding the location where the photos was taken directly into the photo. This is often referred to as "geotagging". If you want to put your photos on maps, it's a setting that you'll want to make sure is turned on in your phone or camera. When you upload a photo to the map it'll determine whether or not the photo has been geotagged. If it has you will have two options:
- place the photos at the geotagged location where it was taken
- place the photo where you clicked.
You can force the photo to be placed where you clicked by clicking the "Add at Marker" button. Or if you want to place the photo where it was taken, you can click the "Add GeoTagged" button.
Sometimes the GPS does not correctly identify where a photo was taken. I've had it happen that photos get placed miles away from where they were taken. Mountains, tree cover, and other factors affect how accurate the GPS coordinates are.
Once you click one of the add buttons, your photo will be added to the map. If you originally clicked on a route or track the photo will be associated with that route or track. This means if you search the site and bring up this one track or route the photo will be displayed along with it. See Searching below.
Another way I use photos on tracks and routes is to mark where interesting things are. For example, the photo I added to Mt Sterling Road above clearly shows the unpaved section started at a point before I marked it .
So oftentimes I find it's best to upload photos first and use them to guide where I mark good or unpaved sections.
If you want to remove the photo you can cilck on it and select "Remove". (Note that removing a photo from the map DOES NOT delete it from the server. It just removes it from the map.)
Adding YouTube and Vimeo Videos to the Map, Routes, or Tracks
You can also add Youtube and Vimeo videos to the map or to track and routes.
The process is similar to adding photos however you must first sign up for a YouTube or Vimeo account, upload the video, and get the link. (We don't have the bandwidth to host videos ourself at this time I'm afraid.)
Once you have a video uploaded to your service of choice get the URL of the video. On YouTube select the Share button under the video and click Copy.
Then click on the map, track, or route where you want to place your video. Click on the Video Camera icon in the track popup.
Adding video works just like adding links. Once you paste the location of the video into the box, the details of the video will be fetched and you'll have the opportunity to edit the title and description in addition to adding some tags. You can also select the cover photo from the caroursel.
Just like with links, when you post a video to a map in a group, the video will be added to the group videos tab.
Once placed, the video will be represented by a camera icon.

Here's the map with the video:
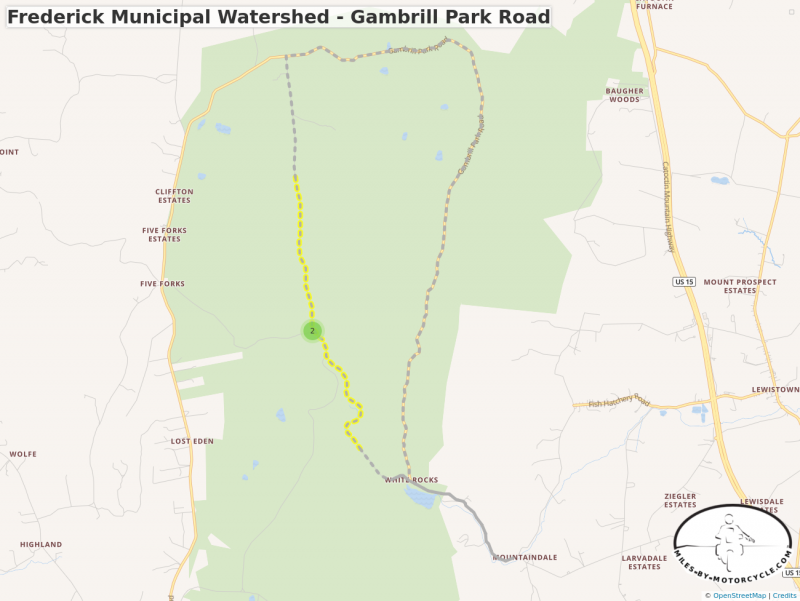
Frederick Municipal Watershed - Gambrill Park Road
Part of the dirt roads/trails in the Frederick Municipal Watershed
Adding Links to Routes or Tracks
Oftentimes, there are useful links out on the World Wide Web which provide additional information about an area or a road. I'm always trying to find good places to put links that related to places I've been or places I may go.
Miles by Motorcycle supports the idea of adding links all over the place. Links can be added to tracks, routes, and points of interest. They can also be embedded into posts and comments or added directly to the links tab in a group.
The link system here is roughly inspired by Facebook. When you add a link, the site does it's best to pull details from the linked page. It then opens a popup with whatever details it was able to find about the site filled in. If there are images on the page, it'll give you a carousel where you can select the image from the site to associate with the link. There's also a place to add a title, description, and tags.
For example, Mt Sterling Road through Smoky Mountains National Park is on American Rides Map's OR1 map. So I might want to add that link to that map directly on that track:
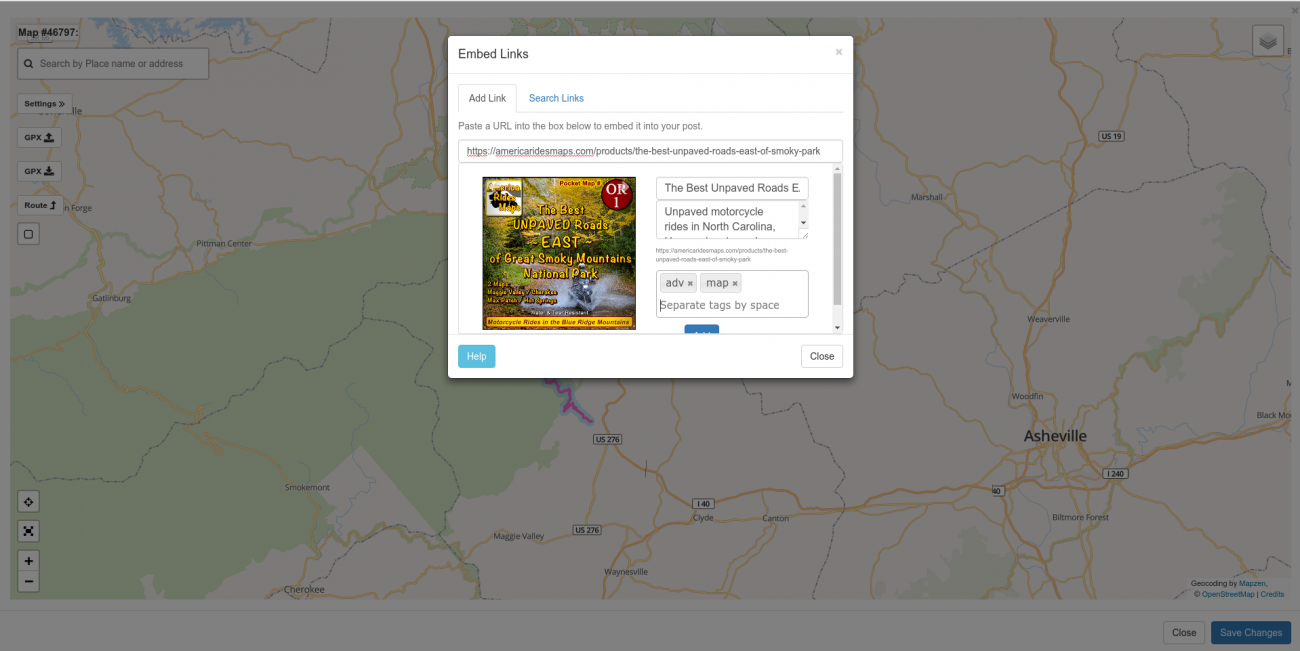
Just click the Links tab then select Add Link. Paste the full link into the box. If the link has not already been added to the site, you'll see a "Getting Site Details" message. Once the site has been fetched, you'll have the opportunity to describe the link, add some tags, a description, and select one of the photos from the site to include with the saved link.
Once you have the details of the link set the way you like, you have to click the "Add" button below the details (you may need to to scroll to see the add button.)
Then click Save to save the link to the track.
If the link has already been added to the site, it'll show you the entry and give you the option to add the link to your track.
IMPORTANT: Nothing is saved to the server until you click the SAVE button down at the bottom right corner of the map window.
In summary, to add a link to a track:
- click on a track or a route to bring up the properties popup.
- select the Links tab.
- click add Link
- paste the link into the box or you can use the search tab to search for links that have already been added to the site.
- edit the title, description, and add some tags.
- scroll down a bit to click the "Add" button.
- click the save button on the track popup to save all your edits to the track.
- once you're done with everything you want to change on the map click SAVE in the lower right corner of the map to save everything to the server.
If you're saving your map in a group and you include any links in the map, the link itself will show up in the links tab in the group. For example, to see the list of links that have been saved in the MBYMC Public Group click here.
Exporting to GPX
Maps can be exported to GPX files. This is useful if you want to load routes, tracks, or points of interest from your maps onto your GPS.
For maps that you have created, you always have the option to export it to a GPX file yourself. Simply edit the map and you will notice a download GPX button on the left.
If you want others to be able to download your map as a GPX file, you can edit the map and open the settings slideout. Click the Options tab and then select the checkbox next to the "Allow GPX Download" and then save it. Now any member of the site who is allowed to see your map will see a button to download it as a GPX file.
Saving
No changes are saved to your map on the server until you press the "Save Map" button. This means you can cancel your work at any time. However, it also means that any changes you make to routes, track waypoints, points of interest, and annotated sections will be lost unless you remember to save the map.
There are some exceptions to this, however. At the time of this writing links, photos, and videos are added to the server immediately when you enter them but they are not associated with the map until the map is saved. This means if you add a photo, link, or video to a map but then cancel the map without saving it, the photo, links, or videos will still be present and available on the server. They just won't be associated with any map. You can see this in action by creating a map in a group, adding a photo to the map, and then closing the map without saving it. The photo you added will be listed under the Photos tab in the group. (It's easier to simply do an advanced search to find the photos you've just added. See below.)
As a result, if you decide that you do not want the photos, links, or videos that you added to the map on the site, you will need to do a quick search to find them and delete them.
This leads us to to what makes the Miles by Motorcycle mapping system different from any others I've come across. It has also been the source of some confusion.
When you save a map, all the items on the map are saved to the database individually. Each route, track, point of interest, photo, link, video, etc gets its own entry in the database and can be searched for indivdually. (See Searching below.) The map itself is then just a "container" that "mentions" all of these various items.
While it adds some complexity it is what enables perusing the site and adding whatever you see to "Ride Plans" which you can use to quickly plan rides consisting of routes, tracks, pois, photos, etc that you or anyone else on the site has shared.
Editing
You can edit any map that you have created. To edit a map, find it (see Searching below), click on the down arrow in the upper right, and then select Edit.
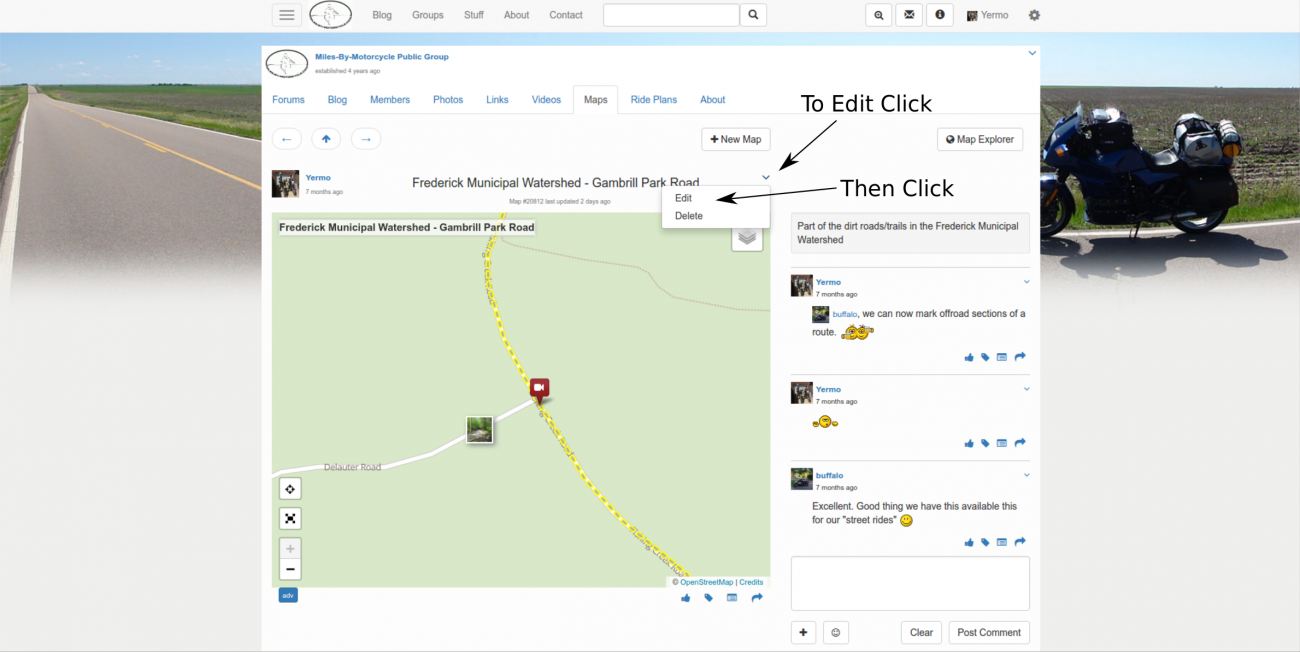
You can then work with the map just as if you had just created it.
One thing to note is that since every element on the map was saved separately if you elect to "Remove" something from the map all it does is break the association between that element and the map. It doesn't actually delete the element from the database.
So, if you click on a route and remove it for the map, you can still find the route by searching for it. So if you want to completely delete something from the server you have to find that thing separately and delete it individually.
This, however, has a side effect in the reverse. If you delete something from the server such as a route, a POI, a photo, etc that element will be deleted from any ride plans, posts, comments, etc that mention it anywhere on the site.
(NOTE: on my TODO list is to add a warning about how many places a given element is mentioned before deleting it in addition to offering a way to delete an item from the database directly from the map editor. Searching for the thing separately to delete it is cumbersome.)
Deleting Items
To permanently delete an item from the server (and every place it is mentioned), search for the item (see below), click on the down arrow in the upper right of the item and select "Delete".
Once something is deleted it cannot be recovered so please be careful. (Strictly speaking, items that are deleted may be present in the last backup but please don't ask me to go in and try to recover them for you as it's quite a lot of work.)
Searching
One of my primary design goals with Miles By Motorcycle was to be able to find things later. On Facebook and other social media sites, there is a wealth of information in the discussions that happen every day but there doesn't seem to be any easy way to go back and find them again. They are all drowned out by the noise.
On this site, I wanted to somehow capture all the valuable information that's posted and turn everything that members share into a kind of collective knowledge base on the subject of motorcycle travel. I looked at the way that I usually try to find things and designed my own search engine around it.
Searching on Miles By Motorcycle you can search by:
- keywords present in the title and description. For example, "Frederick Watershed" which, if you type it into the search box at the top of the site yields 30 results including a couple videos, some photos, a bunch of tracks, a few maps, a ride, a link, a thread, a post, etc.
- tags applied ot the post. For example, typing in "#adv", clicking on adv in the dropdown, and then clicking search yields 91 results as of this writing.
- who posted it (or tagged or liked it)? You can search for things posted (or interacted with) by a given member or members. For example to search for everything I've posted, tagged, or liked on Miles By Motorcycle, in the search box type the @ charater followed by yer and then select "yermo" from the dropdown and click search.
- when it was posted. You can narrow the search results by time range. For example, you can select the advanced search box (the magnifying glass with a plus in it), scroll to the bottom of the popup, and select "today" to see everything posted on the site today.
- what was posted. You can narrow the search results down by type of element that was posted. For example, you can select the advanced search box, and then click the checkbox next to "Video" to get a list of all videos posted to the site.
The results returned by the searches above may be different for you depending on which groups you belong to and what level of access you have.
It's possible to combine all of these features simultaneously into a single search. For example you might want to search for all videos that I posted with the word "Witt" in the title of description, tagged with #transamiltrail, this year.
To do this, click the advanced search icon on the top bar. (Magnifying glass with a plus in it).
Type in "witt" followed by #trans (select Transamtrail from the list) followed by @yer and select Yermo from the list.
Click the checkbox next to "Video"
Select "Year To Date" from the date range dropdown.
If you remember the example of embedding videos, links, and photos on the map, routes, tracks, or points of interest, there was a "Search the Site" tab on each one of those. The search in those popups works the same way the main search does. You can search by member (it's often useful to search for things you yourself have posted by searching on your own username), tags, etc just like in the main search box.
Finding Things By Following Mentions
Sometimes I'm searching for something but I can only remember something about what was posted. For example, I was just thinking about a guy I met on the Trans America Trail who drove his Land Rover along the entire trail. He has a website.
I can't remember his name.
I don't remember the website.
I don't remember exactly where I met him.
But I do remember, I had a photo of him and his land rover that I took last year.
So maybe I can search for photos last year tagged with #transamtrail shared by me.
Enter #transamtrail @yermo click photo and last year.
The results should look something like:
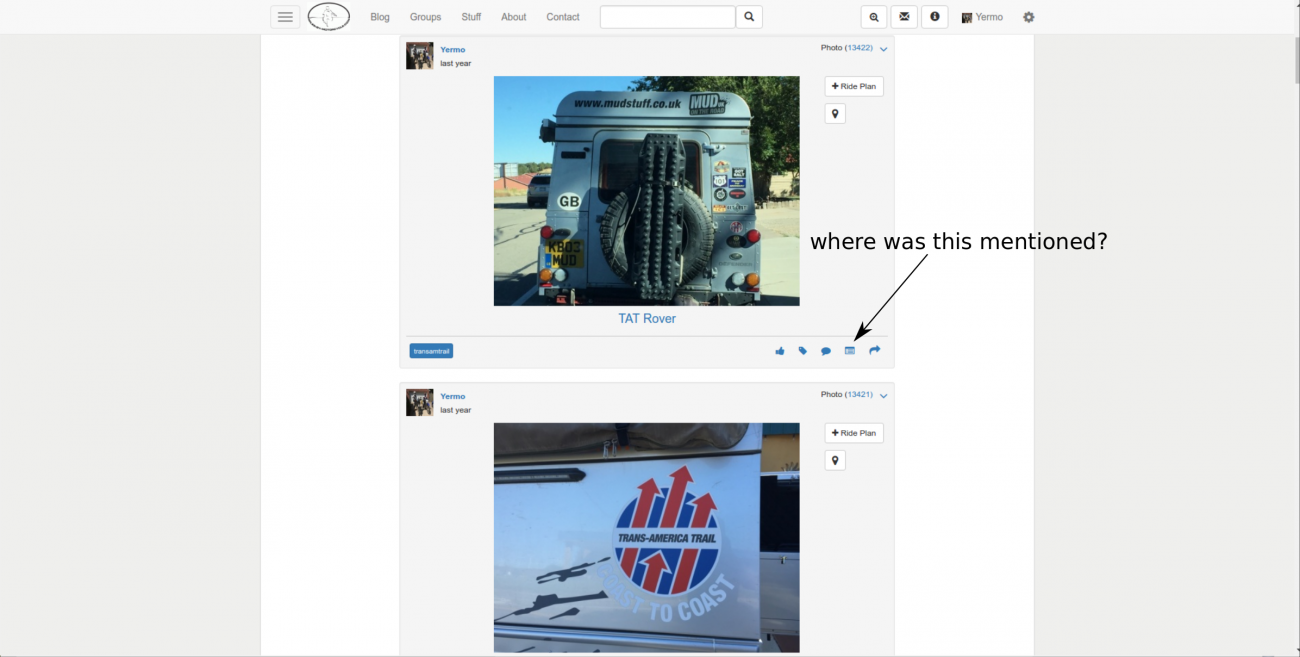
There it is. Now you can click the "mentions" icon to see where on the site this photo has been mentioned.
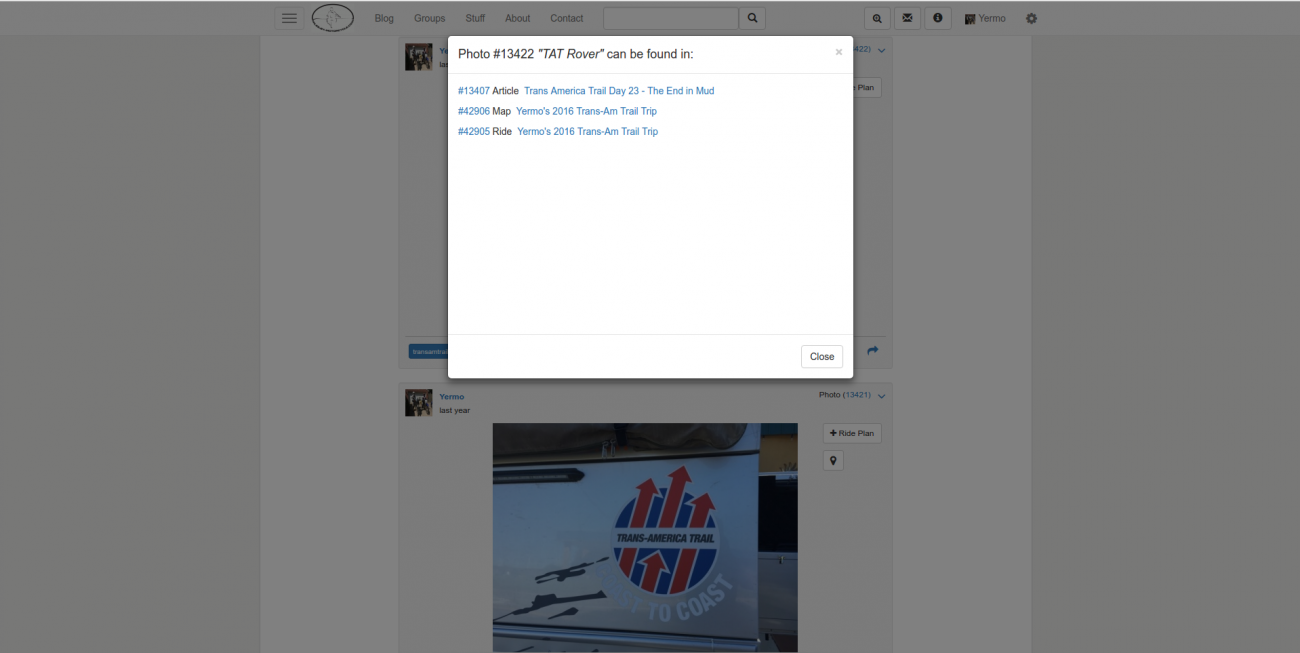
And you can see this same photos was mentioned in a blog article, a map, and in a ride. (More on the "ride" feature in a follow on article.)
Everything on the site is linked in this fashion. So if you can't remember exactly what you're looking for but can remember something that's related to it you can often search for the related thing and then bounce along the mentions unitl you get to what you were looking for.
Searching By Area Using the Map Explorer
A recent addition to Miles By Motorcycle is the Map Explorer. It's in it's early stages at the moment but it is now possible to search over an area for any photos, videos, tracks, routes, or points of interest posted in that area by keyword, tag, and/or member.
The map explorer is available from the top left dropdown menu:
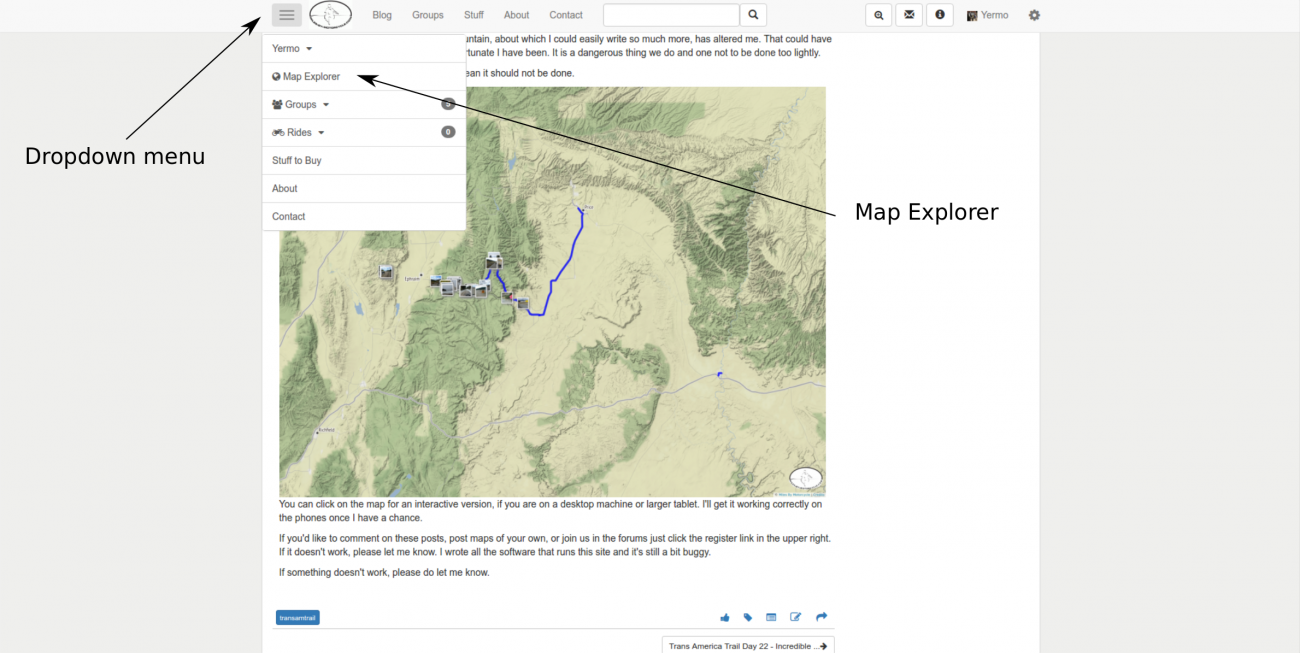
The map explorer will bring up a map with a search box. The search box on the Map Explorer however (as of this writing) only lets you search the Miles By Motorcycle database. It does not let you search by geographic location (yet).
The search box works the same way the main search box works. You can search by keyword, #tag, or @username. As of this writing, however, you cannot (yet) search by element type or date range but that is coming in an upcoming version.
To see all the things you've posted in an area, zoom and pan to the area of interest and then type @ followed by the first few characters of your username, select it from the list and click the search button. For me searching around my local area yields:
Depending on how large an area you are searching and how many items are returned it can take QUITE a long time for the map to render. So in general it's best to be very specific about searches and keep the areas small.
I find the Map Explorer to be quite useful as I travel. If you have been tagging routes or places with #todo, you could search over the area you're in with @ your username and #todo to see them. This is a great way of seeing all those roads you intended to ride in a given area. It's often easier just to add a #todo tag to places and search in the map explorer than it is to create ride plans but your mileage may vary. I tend to do a combination of both.
Once you have some results, you can then click on each track, route, photo, POI, etc to get details about it.
When you click on an item in the map explorer a properties popup will be displayed. It's because the Map Explorer can return an overwhelming number of results that adding good titles, descriptions, and tags to tracks and routes is a good idea.
You can click on any track, route, point of interest, or photo from the map explorer to get a similar popup.
Each element (a.k.a. "object") on Miles By Motorcycle gets its own unique number that is used to reference that element. It's listed at the top of the popup. (You'll also notice that for each photo, map, route, and POI in this article the object ids are also listed.) You can click on the number to jump to a view of that item by itself. From there, if it's something you shared, you can edit it.
Along the bottom right of the popup are a list of icon buttons which are:
- like
- tag
- comment
- mentions
- share
You can let the poster know you liked their post by clicking on the like button. If you however over it you can see what other members have liked the item.
You can add your own tags to the item. For example, if you wanted to remember this particular track you might tag it as I do with "#todo". Just click on the tag icon and add your own tags. (Then later you can search the site for tracks tagged by you with #todo).
You can also start discussion right here about this track. Click the comment icon to leave a comment for the poster. They will get a notification that you left a comment. In this way you can have discussions directly in items on a map.
The mentions button, as described above, will show you all the places where this item has been mentioned.
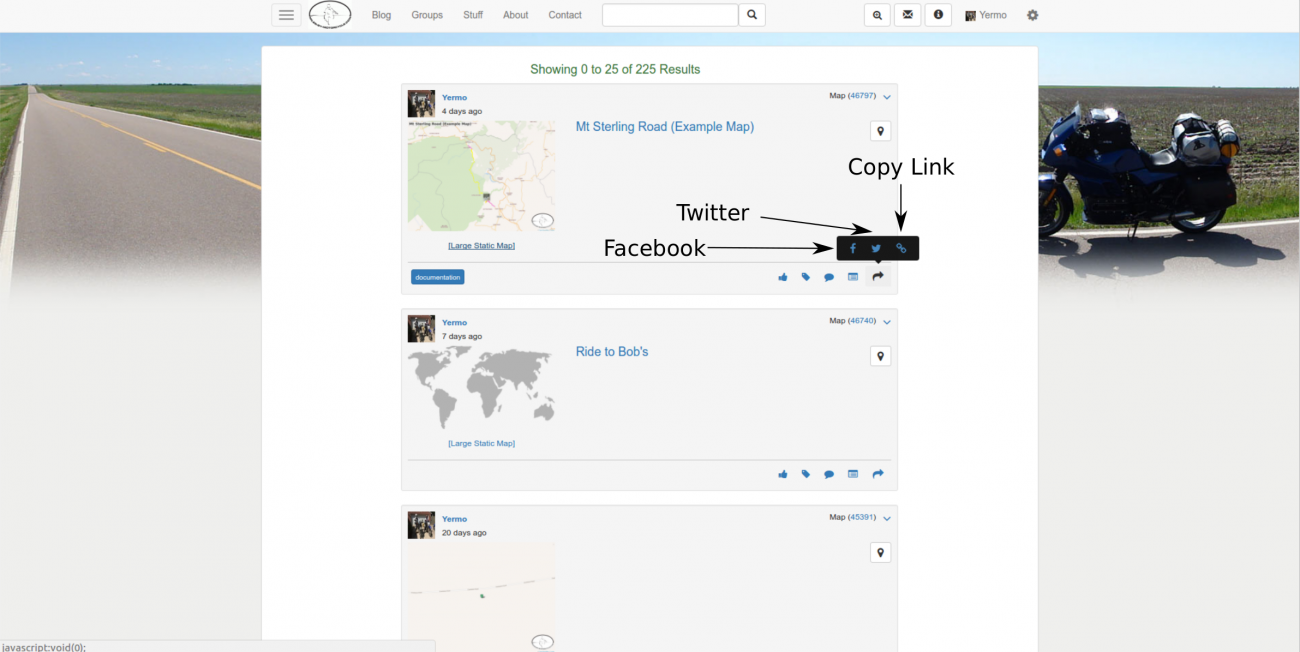
Finally, for items that are posted in public groups you have the ability to share the item to Facebook, Twitter, or to copy a permalink for sharing in email or other sites.
Lastly, if this is a place you might like to visit or you think you might want to organize a ride to include this thing, you can click the +Ride Plan button to add it to a ride plan of yours.
Sharing
Lastly, once you have maps or ride plans built, you can embed them directly into your posts around the site.
For instance, in the forum, you can embed maps into your posts by clicking the Map Marker icon at the bottom of the post entry box:
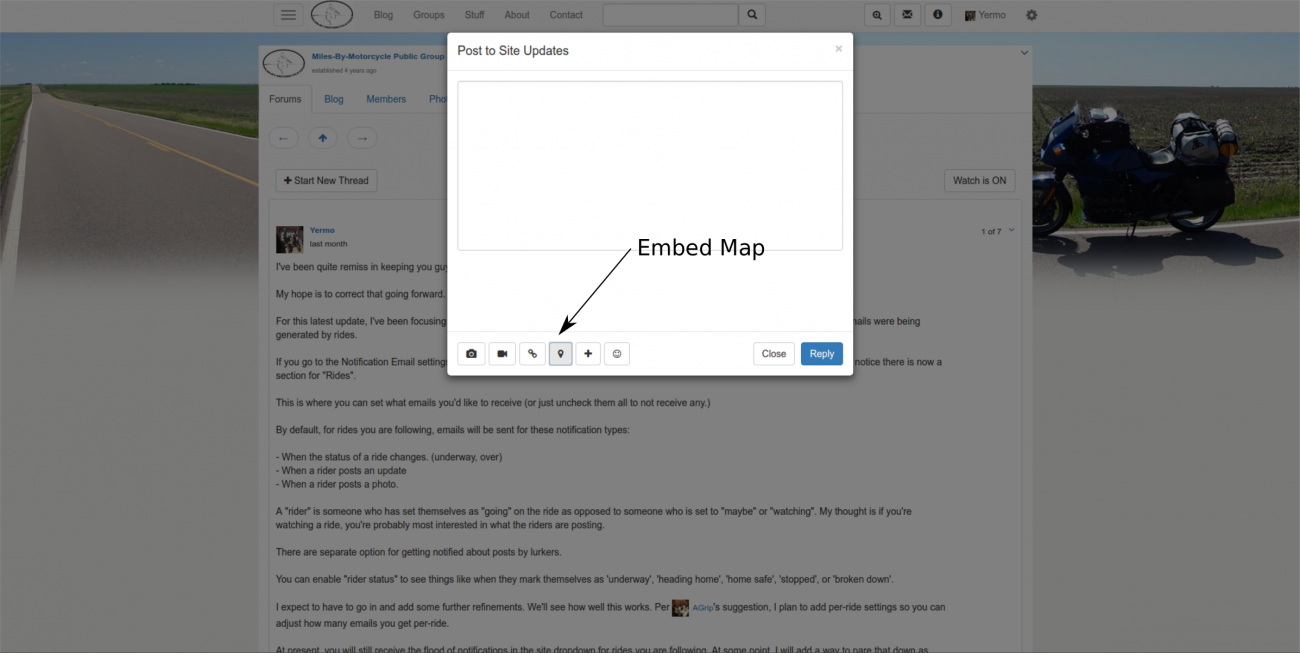
Click the map marker icon and then click the Search For Maps tab. Enter @ followed by the first few letters of your username and select it from the dropdown then search. Click "Embed" new to the map you want to embed in your post.
Static Maps
Each time you save a map, a static screenshot is generated. It sometimes takes a few seconds to generate. Static maps are useful for sharing as photos in ADVRider photos and for posting to Facebook and Twitter.
To find the static version of any map, search for a map. A link to the static version is included.
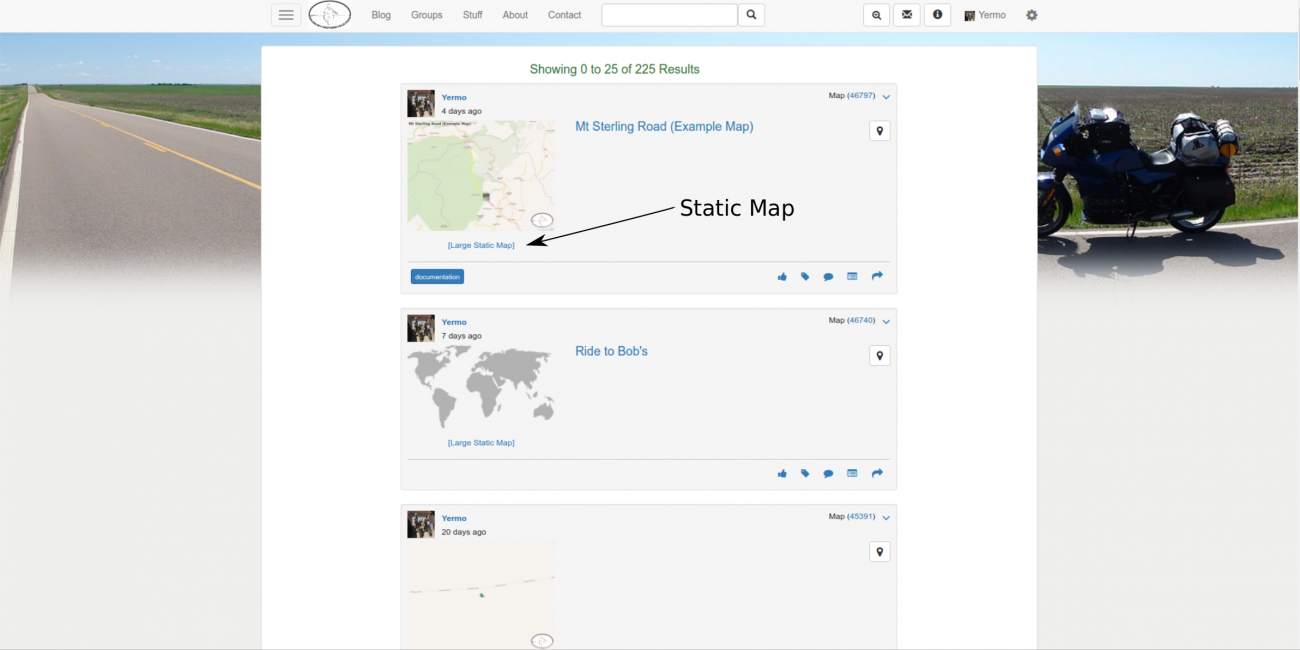
To use a static map in an ADVRider post right click on the "Large Static Map" link and select Copy Link Address.
Then over at ADVRider you can use click the Image button and paste the link. For example here's an example in a thread on the subject of creating image files from GPX files.
You can also upload the image to Facebook or Twitter. You have to first download it to your computer. Click on the Large Static Map link to open a page with just the map image then right click and save the image to your computer. Then upload the image to Facebook or Twitter
I often post map images to the Miles By Motorcycle Facebook page for example.
You can also share links to maps here on Facebook and Twitter using the share icon. Just hover over the share icon. From there you can:
- share to Facebook
- share to Twitter
- right click and copy the link address to the map for sharing in email or elsewhere.
When Things Go Wrong
The software is still in a relatively early stage and there are still a number of bugs that I am tracking down. Sometimes maps refuse to save. You'll click the button and nothing happens. If this happens please let me know by posting in the Public MBYMC Group or using the contact link.
There are a number of other glitches and gotchas. I'm actively tracking them down and fixing them. Letting me know when things don't work as you expect or if there are features you'd like to have is a great way of influencing how things get done here. You wouldn't believe how reluctant people are to tell me what's broken.
If I don't know it's broken for you, I can't know to fix it.
The Future
There is more to the site than has been discussed in this article. Over the coming months it's expected that many improvements and refinements will be implemented to make the site easier to use and navigate. I have quite a number of features planned and hope to be in a position to make some announcements about the future of the site come the first quarter of 2018.
There are still a number of bugs and many features are still a bit awkward to use, but it's all coming along and over the coming months we should see dramatic improvement.
I know it's been a very long article that has covered quite a bit. If you have made it this far, I thank you.
If you have any questions or comments feel free to comment below or reach out to me via the contact link or post in the forum. I can also be reached on Facebook.
And most importantly ,if you try it and run into problems I would greatly appreciate any feedback you can give. I can only fix it if I know it's broken.
Thank you.
You must be a member of this group to post comments.
Please see the top of the page to join.