Map Help
Nothing brings a travel plan or story together like seeing it on a map.
On Miles-By-Motorcycle, you can create attractive interactive maps to plan your next big trip or tell the story of one recently taken. These maps can then be inserted into forum posts on this site, such as this one, just like photos, links or other things can. Each interactive map has a corresponding static map like the one below which can be shared on Facebook, Twitter, ADVRider and other locations.
What I Wanted To Build
Typically, when planning a larger trip, I'll post questions to a few groups online asking for recommendations on good roads, places to see, places to avoid, and places to stay roughly along my proposed route. Then, as I travel along my route, I'll come across places I'd like to visit again or recommend to friends. I'll also find good roads that I won't want to forget.
Later, friends will inevitably ask me about the trip and others will ping me about things to see and roads to ride when planning their own trips.
So I wanted a central place where I could keep all this information in a convenient form on a map. I wanted something where:
- I could keep the pre-trip plan with all the suggestions of roads to ride and places to go whether they are places I initially intend to visit or not. It's nice to have options.
- I could document the actual route that I took, the good roads (or trails) I found, and the things of interest I encountered along the way possibly with photos.
- Others can look at my trips and the trips of others, and pick and choose parts to build their own trip plans.
- Those other travellers could tell their own stories and have the whole process repeat itself.
- Together we could build up a library of great roads, places, and trips to take that we can all share, each from our own personalized perspective.
- We have the licensing flexibility to do with these maps whatever we want with the least encumbrances possible whether it's sharing them on Facebook or even publishing them in a book or including them in some video blog.
As of this writing, July 2014, I have a good portion of the software built. It's still a pale shadow of what I want to build, but it's getting there.
Here's an example of a planning map I built using recommendations from members of the BMW MOA Facebook group.
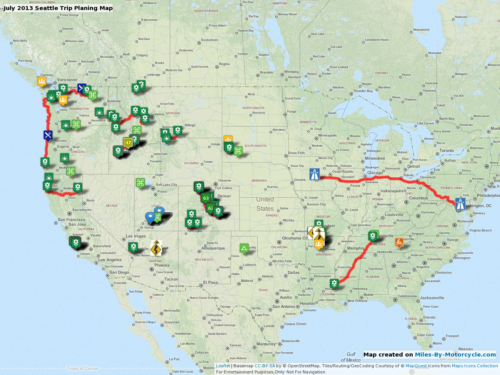
You can see the interactive version here. As it turned out, having all these suggestions clearly laid out on a map completely changed my trip across the country as I found myself much more likely to ride good back roads than stay on the interstate.
Map Concepts
Maps may contain:
- Routes that have been mapped by hand.
- Tracks from a GPS (GPX)
- Favorites from a GPS (GPX)
- Tagged Point of Interest Markers.
- Tagged Roads for sections of good road.
For the moment it's best to create maps using a desktop browser.
A Word on Tagging
Maps, Points of Interest and Good Roads can be hash tagged in ways similar to what you see on Facebook, Twitter and others. But unlike those other platforms, tagging here allows you to organize things so that you can find them again. You can search for maps, roads and points of interest by tag by clicking the Advanced Search link in the upper right, checking the Point of Interest, Road, and Map checkboxes and entering the hash tags you want to search for (include the # symbol in the search box to get the tagging dropdown to appear.)
Creating a New Map
To create a map simply click the New Map button the Maps page which will open the new map page. At the moment, you have to create a map as a first step from the maps page before you can post it in the forum.
The Title field is required. You should give your map a descriptive name. The Description field is optional.
The "Your Tags" field allows you to apply hash tags to the map. (Bug Note: In this field don't include the # symbol. I know, it's inconsistent and I'll improve it in an upcoming version of the software.) I typically tag things with the name of my destination, e.g. dealsgap or blueridge.
For the moment, the map view opens centered over Washington DC. In an upcoming version I'll add the ability to query your current location and pan the map there.
Controls on the Map
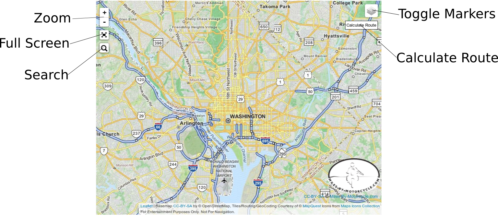
The +/- works as you would expect and allows you to zoom in and out of the map.
The Full Screen button expands the map to fill your entire screen. Unfortunately, adding of points of interest and tagging of good roads doesn't work when the map is expanded. (The dialogs appear under the map in this case. I'll fix it in an upcoming version.) You can press the ESC key or click on the full screen icon again to go back to the normal view.
Searching For Locations
The Search button opens up an input field where you can enter addresses to search for. This queries the Open Street Map "Nominatim" geo search service. Unfortunately, this service leaves quite a bit to be desired. You can enter a latitude and longitude in decimal notation. You can search for city and state, such as College Park, Maryland. Many but not all US postal addresses work. Some famous landmark names work. For instance, "Yellowstone National Park" works.
My understanding is that they are working on an improved geo search service. In the mean time I have been looking for alternatives but unfortunately to date all have licensing limitations that prevent me from using them for this site.
After typing in your search terms, you have to press the ENTER key. Clicking on the search icon again just closes the input field. If there are multiple matches after you press enter, a dropdown list will be displayed. When you select an item on the list a route waypoint marker will be dropped on the map at that location.
Toggling Markers and Routes
When working on a map with a bunch of markers, it can get cluttered. Hover the mouse over the Toggle Markers icon and uncheck those items you'd like to hide on the map. This does not affect what gets saved with the map, just what's currently visible.
Calculate Route
When you search for a location, it drops a numbered waypoint marker on the map. If you have more than one waypoint marker on the map you can click the Calculate Route button to query the Map Quest route service to calculate a route between the two points. For instance, search for "College Park, Md" and select the first result. You'll see a #1 marker on the map. Search for "Robbinsville, NC" and select the first result. You'll see a #2 marker dropped on the map. Now click Calculate Route. You should see a calculated route placed on the map.
You can also manually drop route waypoint markers by simply clicking on the map. With each click a new marker will be dropped with a number. When you click "Calculate Route" it will calculate the a route that crosses the waypoints in order. You can delete waypoint markers by right clicking on them and selecting "Remove from Map".
There is no hard limit to the number of route waypoints you can include but after you reach several dozen points it can get a bit slow.
Forcing a Particular Route
The route algorithm chooses the most time efficient route between the listed points. We are, however, motorcyclists and are interested in the most interesting roads. I don't have the rubber banding support built yet where you can drag the routes around like you can on Google Maps but in lieu of that if the calculated route is skipping a section of road you'd like included you can drag route markers around and add new ones until the line follows the route you prefer. For the case where you have a bunch of markers and you want to adjust something in the middle, you can right click a marker and select "Insert Marker" and it'll insert another marker there. Usability Note: the new marker is displayed under the existing one. So if you right click on Marker 2, it's number changes to 3 and a new #2 marker is inserted under it. So inserting markers involves a bit of dragging things around. I'll improve this in a future release.
Mapping out the Blue Ridge Parkway involved quite a bit of inserting and adding markers to get the route I wanted.
Multiple Routes
It's often useful to be able to have multiple routes on a map. You can right click anywhere in the map and select Start New Route. When you drop the next waypoint marker it'll be a different color and will start from 1. Clicking calculate route only affects the currently selected route.
To work on a previous route just click on one of the waypoint markers for that route and select the "Select This As Current Route" link.
Points of Interest
You can right click on a location on the map and select "Add Point of Interest" to mark an interesting location. A dialog will appear identifying the address of that location. The name is required. You can select the icon to use. You can also select a set of tags to apply to this point of interest to make it easier to find later. Once you click save, the point of interest icon will be placed on the map. You can click the icon to re-open the point of interest dialog.
To remove a waypoint marker from the map just right click on it and select "Remove from Map".
Photos
You can upload geo-tagged photos (photos with embedded lat/long location data) onto the map. Click the "Add Photos" button below the map which will open a dialog window. Select the photo album to upload the photos into. (M-BY-MC Photos for the moment. In an upcoming release you'll be able to create your own separate albums.) Then click the Add Photos button to select photos from your computer to upload. You can select multiple photos.
It will then show you a thumbnail of the photos you've selected. You can then optionally add a title and description. Click Upload All to upload the photos. For those photos that have geolocation data, a camera icon will be placed on the map at that location. Clicking on the icon shows you a thumbnail.
NOTE: the add photos window doesn't automatically close after the photos have been uploaded. This will be addressed in a future release. Just click close after you're done.
Uploading Tracks from Your GPS
Most GPS's record the track you follow in GPX files. GPX is a standard format for exchanging route and track information. Typically you can get at these files on your GPS by plugging it into the USB port on your computer and copying over the files from the GPX directory. Each GPS is slightly different in this regard. Consult the manual for your GPS.
To upload a GPX file, click the Upload GPX Track button below the map. It will open a dialog window. Click Choose File to select the GPX file you would like to upload. Then click submit.
Wait a few moments. Depending on how large the file is it may take some time. If everything works you should see the tracks, route and favorites from the GPX file displayed on the map.
Favorites are marked with blue tack icons.
IMPORTANT: Most GPS's don't give you a way of exporting some favorites and not others. So for instance, you may have a favorite for your house and if you upload a GPX track that favorite will likely get included. Review the favorites on the map and delete any you don't want included. Simply right click and select "Remove From Map".
Editing and Tagging Sections of Routes and Tracks
Oftentime when uploading a track from a GPS there are sections of the track you'd like to remove. For instance, I typically remove the section leading to my garage.
Sometimes I have GPX tracks for multiple days of riding and I just want to include a certain day. There are many reasons why one might want to delete sections of a route or track.
Selecting Route Sections
First you have to select a section of a track or route. Click on the route at the start of the section that you would like to delete. A menu of options will appear.
You can delete the entire route or a section of it. To delete the entire route select "Delete Entire Route".
To delete a section of a track or route, select "I want to select a small section to Tag/Describe". (Yea, I know, mis-labelled. I'll improve it.)
Next click on the end of the section you would like to delete. A similar menu will appear. Select "Delete this Section". If all works as it should, the section of the route will disappear.
NOTE: If you have a GPX track where you've been running back and forth over the same section of road multiple times it's sometimes difficult to select exactly the section of track you want. Sometimes you have two overlapping tracks and the one you want to select is the below another. I do not currently have a good way of dealing with this problem.
Tagging Good Roads
You can use the same process of selecting a section of a road to describe the road and tag it. Select a section of road as before. Click on the start. Click "I want to select a small section to Tag/Describe". Then click on the end of the section and select "Mark End of Section". A window will popup where you can fill in details about the road. Give it a good descriptive name and a description of why you are tagging this road.
NOTE: there isn't a separate entry for tags on this screen (something I will fix). You can add tags directly in the description by prefixing them with the hash sign.
There are a list of icons that you can select to mark the start and end boundaries of the tagged road. I'm currently reviewing whether I want to include these because I feel they clutter the map.
When you tag a road, it gets it's own map with a screen shot generated which is listed as a separate entry under Maps. You can also search for tagged roads by going to Advanced Search and checking the Road checkbox.
NOTE: If all you want to do is share a good road, create a map, lay out the route on the map. Select it to tag describe as a tagged road and then close the map without saving it. I will improve this process as well in a future release. It's a bit klunky at present.
Saving the Map
Once you have a map that's set up the way you like it, just click the SAVE MAP button.
PLEASE NOTE: There are huge handstands I'm going through to generate the static screenshot of the map. This involves a hugely heavy process that takes quite a bit of time. It can take 60 seconds or more to process all the items on the map and generate the screenshot. Please be patient. Just getting this screenshot feature to work was a huge error prone pain.
Editing Maps
After you save it out, you can always go back and edit the map again by click on the little edit icon next to the map in the upper right corner of the box.
To delete a map just click the little X next to it.
Sharing the Map
Once the map is saved, you can share it in the forum. Simply start a new post or thread and click the INSERT button. A dialog will appear. Select Map from the dropdown and today for the date range. (Or you can search on the title of the map). Click Search.Then click the Insert button next to your map. Note the dialog does not automatically close after you insert. (Yea, I know.)
You can also share the static version of the map out to Facebook and Twitter. When you save your map, below it you will see the Permalink link. Just right click, select copy and then paste it into Facebook, Twitter, wherever. You can also download the static version of the map by clicking on Download Screenshot link.
The Mentions Tab
When you place a photo, point of interest, or tagged road on a map, a separate entry is added for it which is then linked back to the map. This can be seen from the Mentions tab. If you click on a point of interest from Maps list, below it you will see the Comments Tab and the Mentions Tab. Click on Mentions and you'll see which map the point of interest is listed on. The same is true for every other thing on the site. You can click on a thing, go to the Mentions tab and see where it's been mentioned. In the next version of the software I'm working on I'm expanding on this concept. Sometimes you can't remember what you called a map but you remember the point of interest it contained.
Licensing
These maps are built on top of the Open Street Map project and are licensed under the Creative Commons CC-BY-SA license which means you can pretty much do whatever you want with them free of any charge as long as you keep the credit lines intact. Having this flexibility is a key reason why I did not build this mapping system on top of Google Maps. I wanted to keep open the possibility that these maps could be used in books and other places.