Showing 50 to 74 of 103 Results

How Three Guys Rebuilt the Foundation of Facebook | Wired Enterprise | Wired.com
Walk to the back of Building 18, on the edge of Facebook's new headquarters in Menlo Park, California, and you'll find the remnants of The Battle Cave. Today, this room is just another stretch of open office space, where rows of Facebookers work on who-knows-what. But if you look to your right, at the top of the wall, you'll see two metal brackets that once held a pair of flat-screen displays. That's where Joel Pobar and his crew would track their daily progress.
http://www.wired.com/wiredenterpris...
Configuring and Using the HipHopVM (hhvm) Remote Debugger
Articles about the technology behind the site.
http://miles-by-motorcycle.com/fv-b...
Adventures in Configuring and Running Facebook's HipHopVM (hhvm) JIT Compiler for PHP
Articles about the technology behind the site.
http://miles-by-motorcycle.com/fv-b...

A Visual Guide to a Car Engine | memolition
Car engines are astoundingly awesome mechanical wonders. It s time you learned more about the magic under the hood!
http://memolition.com/2013/11/23/a-...

Hints and advice for BMW K bike motorcycle owners, K1, K75, K100, K1100
Includes hints on how to avoid needing a clutch alignment tool, solutions to common problems, etc.
http://bmwmotorcycletech.info/K-hin...
BMW-AF-XiED R1150 / R1200C & R1100S & K1200RS/LT O2 Sensor Manipulator
Fits all R1150 models, R1100S (S Models only), R1200C and all K1200RS & LT bikes. The BMW-AF-XiED O2 sensor manipulator is a plug ...
http://www.beemerboneyard.com/bmwaf...


How Motorcycle Carburetors work and how to tune and clean them
Here's a link to the kind of carb cleaner I like best (it IS the best) http://www.amazon.com/gp/product/B002ERT666/ref=as_li_qf_sp_asin_il_tl?ie=UTF8&camp=17...
I found this on Keihim carbs I don't know if it applies to the carbs on the bandit. "Fuel screw: With the carbs synched, the engine warmed up to operating temperature, and the idle speed set, adjust the fuel screws so that when you rev the bike in neutral and release the throttle, the revs quickly drop to exactly idle speed again. If, when you release the throttle, the revs hang up a few hundred rpm above idle speed, then drop to idle, the idle mixture is probably a bit too lean. Turn the fuel screws out. Use a minimum of half turn increments until you know you've just about nailed it. You'll drive yourself up the wall trying to tune the thing in eighth or quarter turn increments if you're a mile off. In extremely lean cases the idle will hunt between the proper speed and something above it. If, when you release the throttle, the revs drop below idle speed then pick up, the idle mixture is probably a little bit too rich. Turn the fuel screws in. In extremely rich cases the engine will die after revving the bike and releasing the throttle, unless you've turned the idle speed screw way in, in which case it may act like the idle mixture is a little bit too lean. In slightly rich cases, the engine will respond well to throttle blips when cold, but will die or dip slightly below idle speed when hot. While having an exhaust gas analyzer is almost mandatory during tuning of main and needle circuits, do not rely totally on them to set idle mixture. Use an accurate tachometer (like your ear) and adjust the fuel screws to find the highest vacuum for each cylinder or highest idle speed, which will often be the same setting." http://www.factorypro.com/tech/tech_tuning_procedures/tuning_FCR_Burns,Pat.html
Motorcycle Mikuni CV Carburetor Cleaning for Suzuki, Honda, Yamaha Tutorial
Links below. Step by step instruction on how to disassemble, clean and assemble Mikuni CV Carburetors for Suzuki, Honda, Yamaha motorcycles... I hope you fin...
Starting a thread on the Suzuki GSF600S (a.k.a. Bandit S) which Ben Mendis(https://adv-traveler.com/7576) recently bought. As mentioned on Facebook, I took it for a test ride and the bike stalled on me about 1.5 miles from the house and would not restart. I pushed the bike under a shade tree after a few minutes of trying to get it started. After a little while a man walked up and introduced himself. I started telling him what I was up when I turned away. He interrupted saying he was deaf. Interesting. He spoke and read lips near perfectly. "I'm a Suzuki mechanic and I bet your crank case is over full." We had picked up the bike from the seller but and checked the sight glass but the idea the crank could be overfull is something I would never have considered. "I see it all the time." he said, "they 'change' the oil by adding 4 quarts without draining the old out. My van is just up there, why don't you push the bike over and we'll pull some out with my pump." I did as the man suggested and we proceeded to pull over 1.5 qts of fluid out of the crank before it became visible in the sight glass. The bike started up almost immediately there after. This is something I did not know, that an overfull crank case would prevent the bike from running. Apparently it builds up too much pressure and fluid gets by the rings fouling the plugs. We ran the bike for a moment. He put his fingers on the handle bar to "hear" the motor. "Running a bit rough. There's a stumble. It's been sitting for a long time, no?" he asked. "The carbs are probably dirty. With as clean as the bike is we can probably get away with just pulling the bowls and cleaning the jets. If you've got time why don't you follow me and we'll take care of it." Absolutely. So off we went. He was between jobs so we ended up working outside his storage unit which was filled with tools. Within minutes the tank was off and the carb rail was out. (I'm going to have to buy a bunch of tools. Clearly, I don't have enough.) It was at this moment we noticed the gas tank was leaking from the petcock. We took that apart to find the seals had all hardended. No matter what we did, without new rubber, we could not get the petcock to stop leaking. It was at this moment a thought dawned on me. I had tried to smell the oil in the crankcase to see if it smelled of gasoline and there was just the slightest smell. I pulled open the milk jug we had pulled the oil into. I remember thinking it looked a bit thin. The smell of gasoline was overwhelming. The crankcase was not overfilled with oil, gasoline had leaked down into it. Damn. I had heard of this happening but have never actually seen it first hand. Obviously, we pulled the oil out of the motor immediately. Some time later, he had the carbs disassembled, cleaned and reassembled. I know very little about carbs having only owned fuel injected bikes for the last 21 years so he explained each step of the process showing me how to do it. Fantastic. We put new oil in the engine and he loaned me a little clamp to clamp the fuel line once I park the bike. Riding it back home that evening, the bike was MUCH improved but not perfect. Greg, the mechanic, sent me a few texts mentioning some thoughts on what else needs to be done. It's just crazy the nice people you'll meet on a motorcycle. Bandit S broken down(https://adv-traveler.com/136/photos/506/untitled/7870/bandit-s-broken-down) (https://adv-traveler.com/136/photos/506/untitled/7869/untitled) Carb rail out in minutes. Crazy.(https://adv-traveler.com/136/photos/506/untitled/7871/carb-rail-out-in-minutes--crazy-) (https://adv-traveler.com/136/photos/506/untitled/7874/untitled) (https://adv-traveler.com/136/photos/506/untitled/7872/untitled) (https://adv-traveler.com/136/photos/506/untitled/7873/untitled) (https://adv-traveler.com/136/photos/506/untitled/7875/untitled) (https://adv-traveler.com/136/photos/506/untitled/7878/untitled) (https://adv-traveler.com/136/photos/506/untitled/7876/untitled) (https://adv-traveler.com/136/photos/506/untitled/7877/untitled) (https://adv-traveler.com/136/photos/506/untitled/7879/untitled) (https://adv-traveler.com/136/photos/506/untitled/7880/untitled) (https://adv-traveler.com/136/photos/506/untitled/7881/untitled) (https://adv-traveler.com/136/photos/506/untitled/7885/untitled) (https://adv-traveler.com/136/photos/506/untitled/7882/untitled) (https://adv-traveler.com/136/photos/506/untitled/7886/untitled) (https://adv-traveler.com/136/photos/506/untitled/7883/untitled) (https://adv-traveler.com/136/photos/506/untitled/7884/untitled) (https://adv-traveler.com/136/photos/506/untitled/7887/untitled) (https://adv-traveler.com/136/photos/506/untitled/7888/untitled) (https://adv-traveler.com/136/photos/506/untitled/7889/untitled) (https://adv-traveler.com/136/photos/506/untitled/7890/untitled) This guy landed and just hung out with us for quite some time.(https://adv-traveler.com/136/photos/506/untitled/7891/this-guy-landed-and-just-hung-out-with-us-for-quite-some-time-)
motorcycle wheel bearing replacement, engine bearings removal - ATV
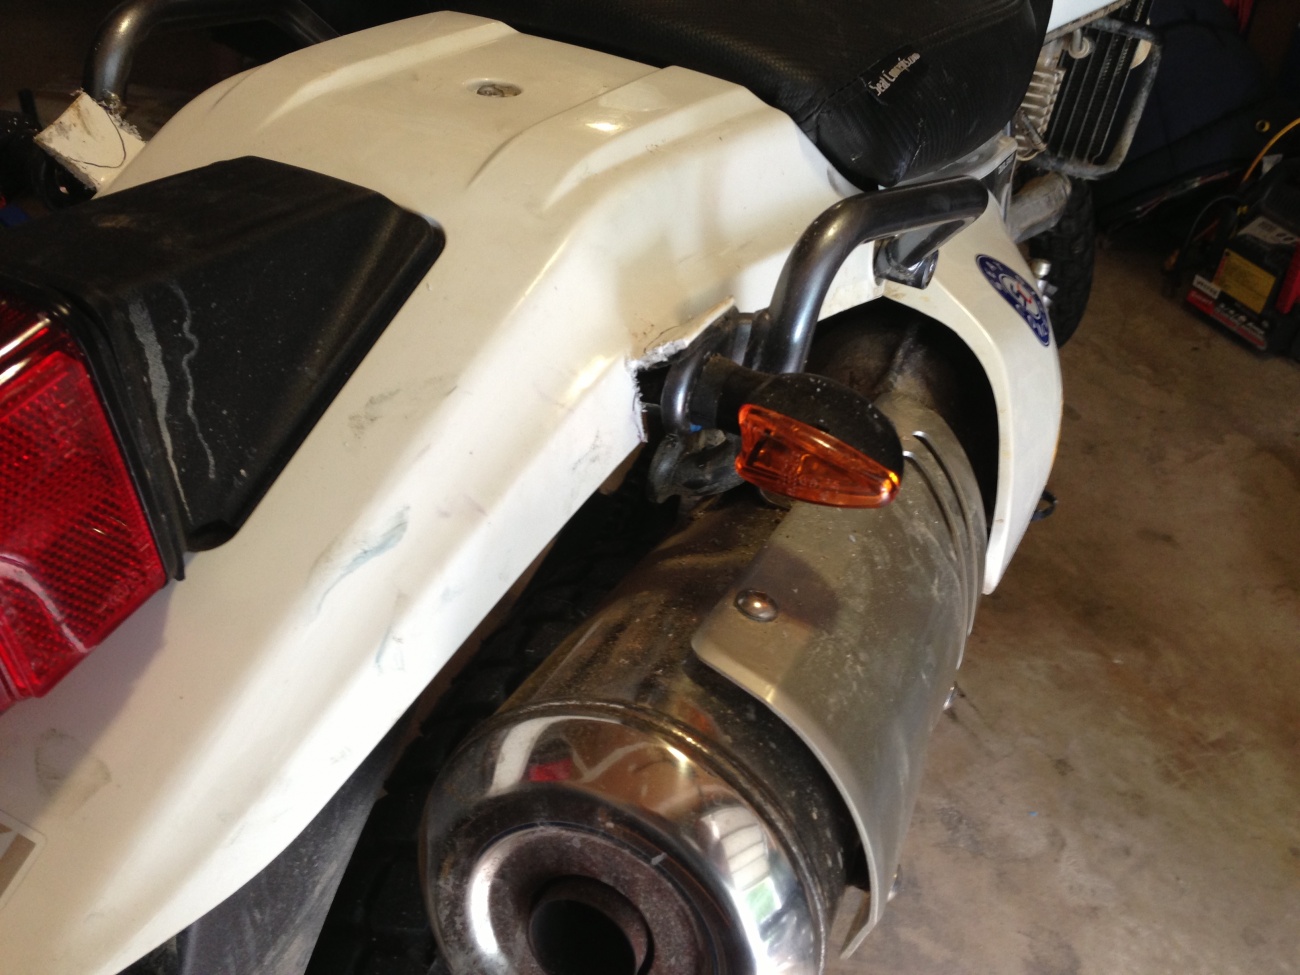
http://www.rockymountainatv.com - Remove motorcycle and atv bearings easily with the Tusk bearing remover. Learn how to change motorcycle wheel bearings and ...
Some pics from replacing the rear indicator lamps on the Mighty DR. This was a great cheap fix for the stock indicators, which can be surprisingly brittle when struck. Step one is to basically take off the body work, very easy on the DR. (https://adv-traveler.com/136/photos/506/untitled/7767/untitled) This is what it looks like under the tail section of a DR when you've been riding it properly. (https://adv-traveler.com/136/photos/506/untitled/7768/untitled) They make it easy to work on, that's for sure. The right side signal wire is on the right side of the bike...the left is on the left. (https://adv-traveler.com/136/photos/506/untitled/7770/untitled) (https://adv-traveler.com/136/photos/506/untitled/7769/untitled) Installation of the new lights was very easy. I used connectors to make it easier to replace if needed and then encased the wires in a protective wrap of gorilla tape before threading them back forward (very easy to do). I had to "modify" the tail piece a bit and could of down a much better job of it, this was done while on a conference call so it could have been worse :-) The New lights look good and are much more out of the way (and also brighter). (https://adv-traveler.com/136/photos/506/untitled/7772/untitled) (https://adv-traveler.com/136/photos/506/untitled/7773/untitled) (https://adv-traveler.com/136/photos/506/untitled/7771/untitled)